With an urge to recreate a fleet of shabby private owner wagons for the BR steam era, George Dent seeks to create a greater sense of texture to plastic bodyshells.
PHOTOGRAPHY: GEORGE DENT

Recent years have seen an explosion in the availability of high-quality ‘OO’ private owner mineral wagons, with a vast range of colourful liveries and branding offered from various manufacturers. It’s a far cry from the turn of the Millennium, as evinced in an article I unearthed by renowned wagon expert Paul Bartlett, in the February 2000 issue of Model Rail.
Back then, the release of Bachmann Branchline’s ‘Blue Riband’ private owner wagons ushered in a step-change from the previous RTR offerings, followed over a decade later by newly tooled Hornby products, plus the great value offerings from Oxford Rail. Each of these are still available today, but the emergence of Rapido Trains UK’s stable of pre-Grouping-era rolling stock has added even more variety, in terms of prototypes and colour schemes.
Therefore, we’re now spoilt for choice, and no longer rely on building kits if, like me, you’re a bit of a wagon nerd and want extra realism. That said, no matter how well detailed and finished the aforementioned wagons are, they still present an overly uniform appearance, thanks to the injection moulded plastic bodyshells.
This was brought home to me while building Peco’s new ‘NG7’ narrow gauge wagon kits, rendered in laser-cut wood (see last month’s issue). Even after painting, the wood grain texture of the components remains visible.
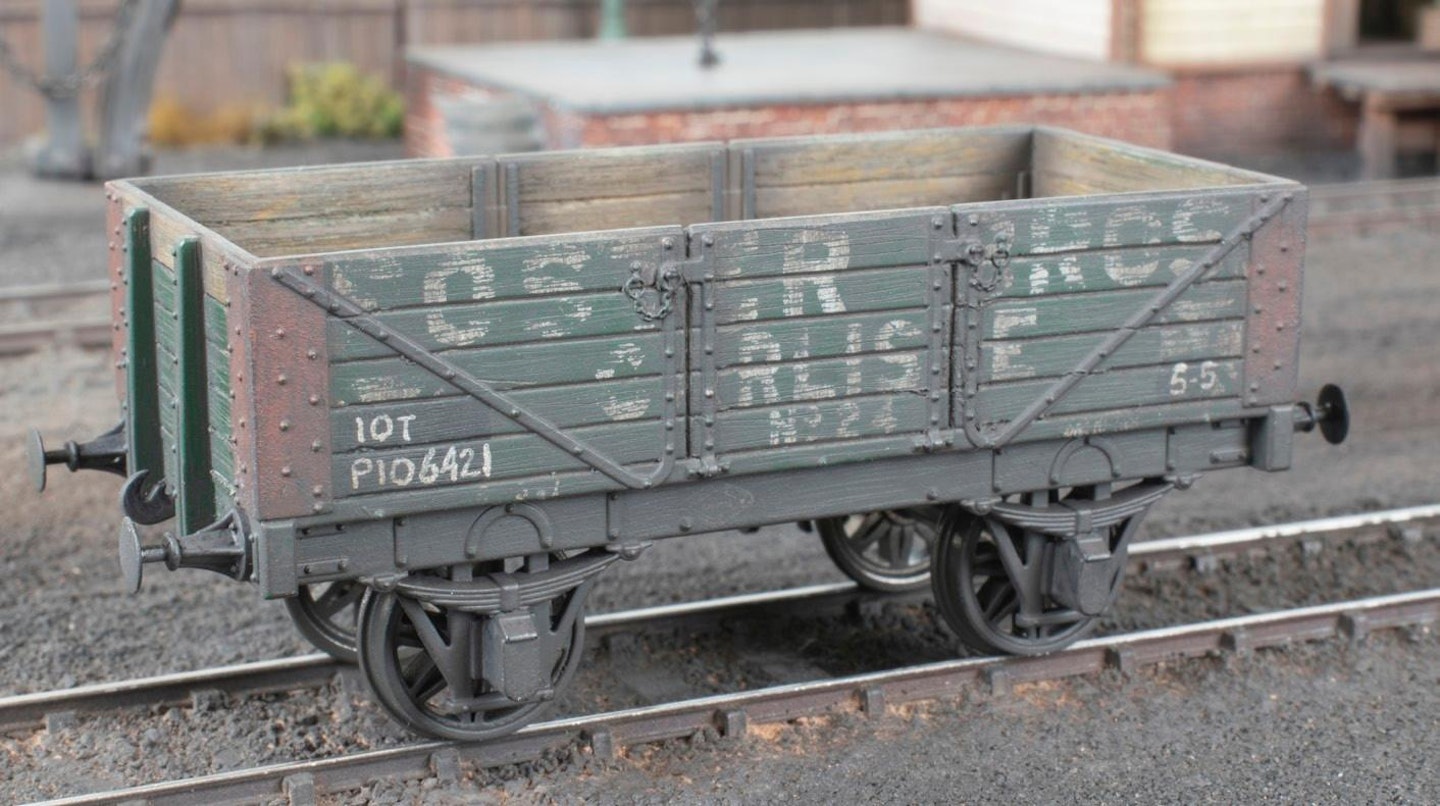
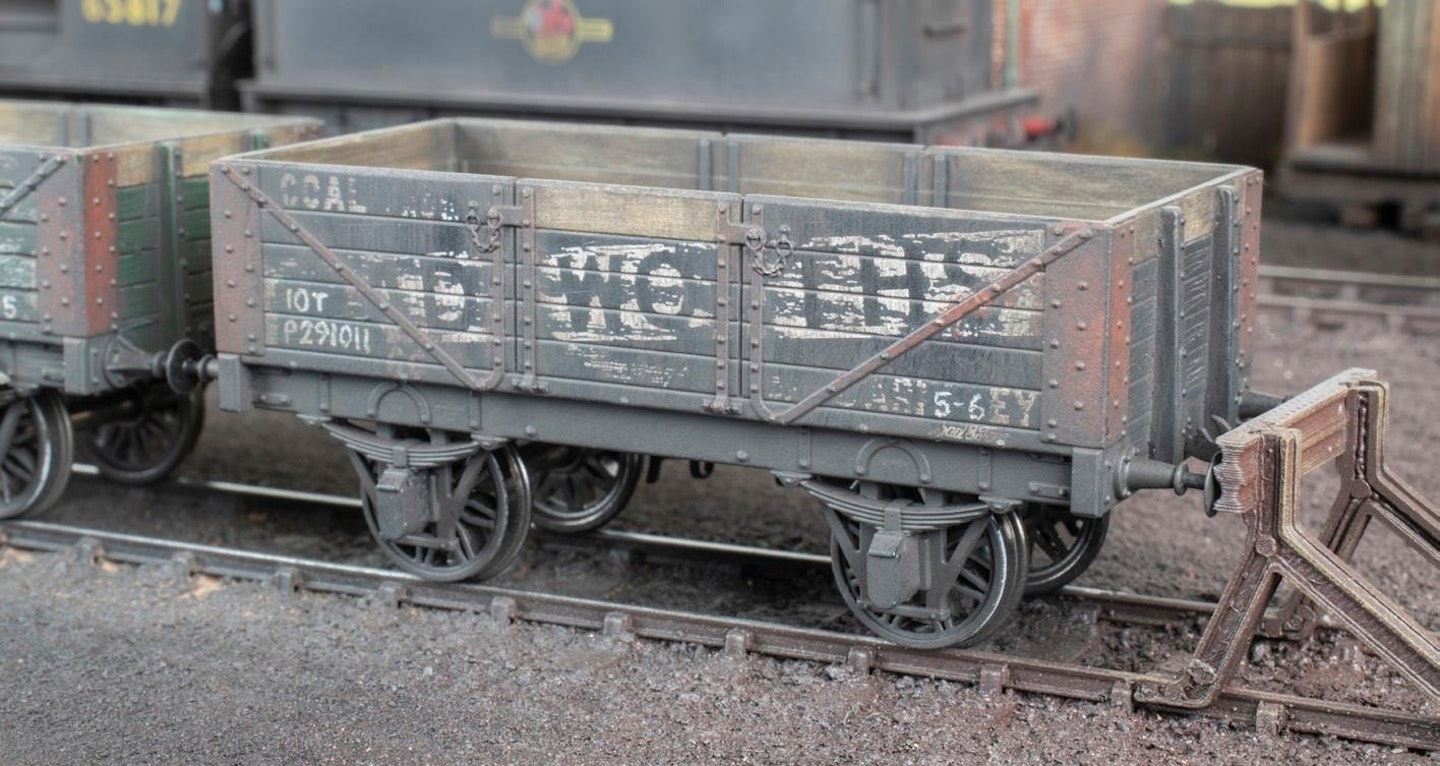
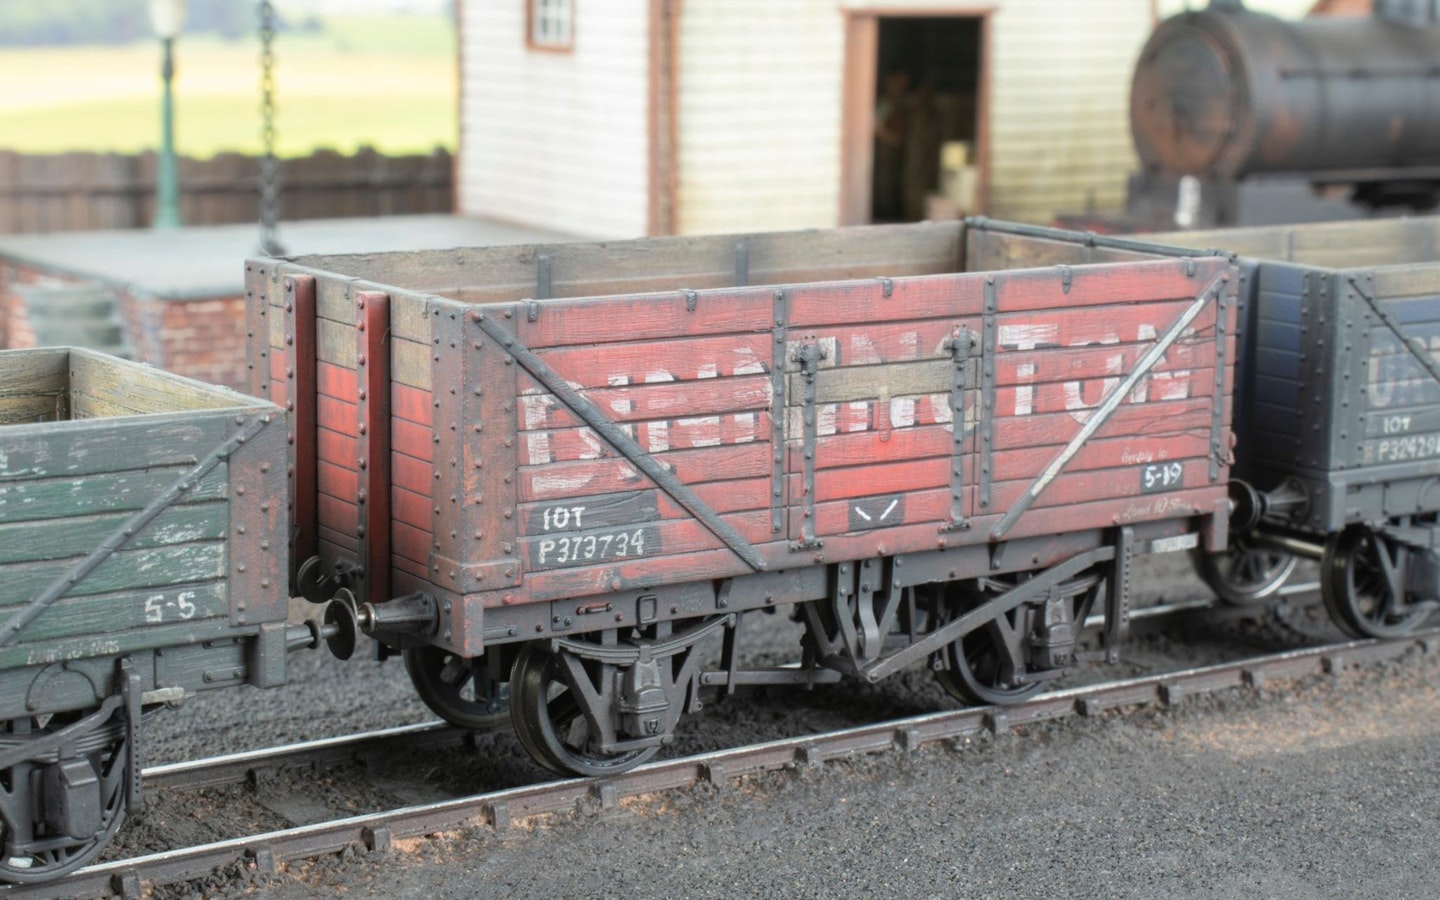
Aiming to replicate a rake of faded and shabby ex-private owner wagons in the post-1950 era, a little research threw up plenty of interesting images to work from. These revealed several striking features that would be fun to reproduce, especially the faded lettering and any replaced (and unpainted) timber planks.
Fading the factory-applied decoration is simple enough, by employing a variety of abrasives, depending on how much of the paint is to be removed. But I wanted to reproduce other key features such as the discernible grain texture, uneven gaps and distressed edges to the planks, especially along the top rails, which would be exposed to regular bumps and scrapes.
Anyone who has read my book Weathering for Railway Modellers, Volume 1 (www.crowood.com) may have seen how I scribed timber grain patterns into an ‘O’ gauge plastic wagon kit, which had a dramatic effect. At the time, I doubted whether a similar approach would work in ‘OO’ but, with a couple of spare evenings and a handful of wagons, I decided to have a go.
Undertaken as part of a layered weathering approach, the scribing and distressing didn’t take anywhere near as long as I expected, not least as these ‘OO’ wagons are much smaller than ‘O’ gauge equivalents. Indeed, I managed to take care of all the physical distressing in an evening. And yes, it was pretty mindless stuffbut, with an audiobook playing away, it was oddly therapeutic.
One thing I realised was how easy it was for the profile cutter blade to wander off course when running along the recessed seams. While this created some happy accidents, giving a few planks some extra distressing, it became clear that starting the task with an embroidery pin was a much safer option.
There was an element of trepidation before the painting and weathering followed, as the wagons looked pretty ragged. But thanks to the added texture, the paint pigments reacted favourably with the rough surfaces and it wasn’t long before I felt vindicated that an evening beavering away with a pin and old toothbrush had been time well spent.
I’m really pleased with the results and will be treating more similar wagons in future – they’re certainly looking at home on my colliery-themed layout.
I heartily recommend trialling these techniques on cheap or second-hand models initially, so you can get a feel for how the tools and abrasives react with the printed motifs and paintwork.
Furthermore, working with sharper tools will afford more control, reducing the risk of damaging the moulded straps and door detail – but watch those fingers!
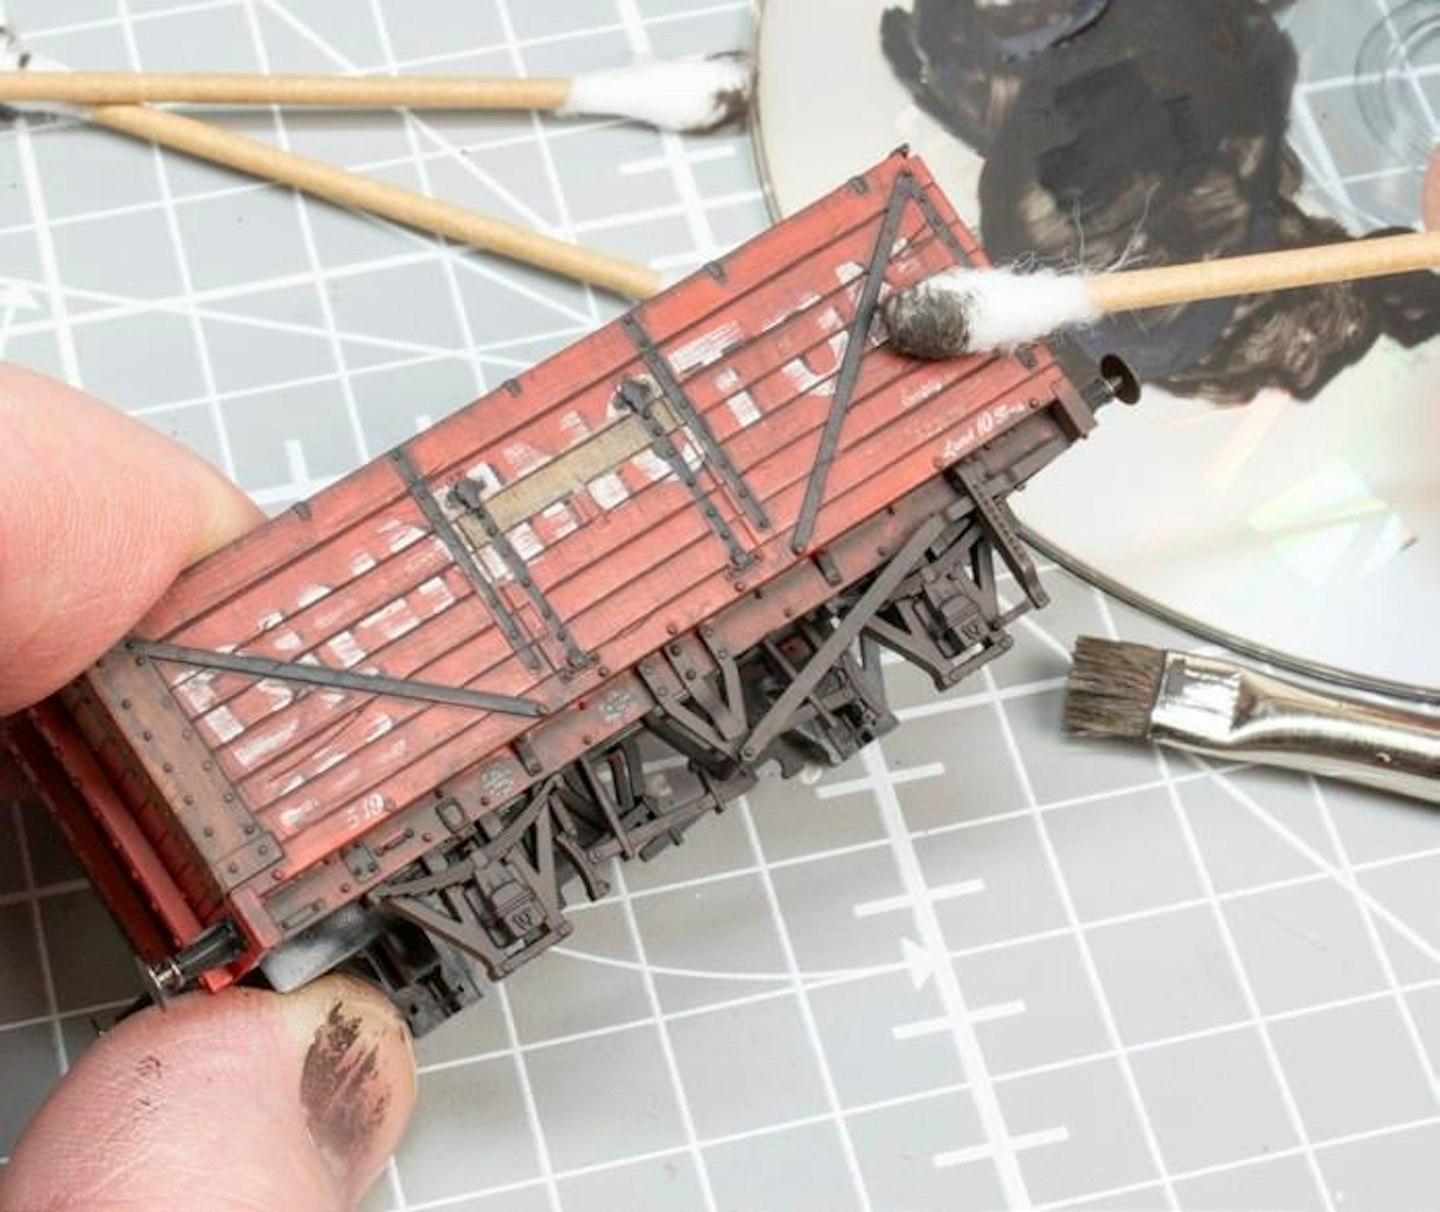
What you will need
SHOPPING LIST
◆ Vallejo acrylic paints set 71.187 Old & New Wood Effects
Price: £23.99
Availability: Scale Model Shop
Web:www.scalemodelshop.co.uk
◆ LifeColor acrylic paints • UA701 Rust Dark Shadow • UA702 Rust Base • UA703 Rust Light Shadow • UA207 Schwarzgrau, LC02 Matt Black • LC37 Matt Burnt Umber • UA610 Dunkelgrau 52 • UA706 Dust
Price: £2.99 each
Availability: The Airbrush Company
Web: www.airbrushes.com
TOOLS
◆ Scalpel and fresh blades
◆ Profile cutter and spare blades
◆ Embroidery pin
◆ Pin vice
◆ Fine-tipped scriber
◆ Abrasive strips (150-320 grade)
◆ Old toothbrush
◆ Paintbrushes
◆ Airbrush and equipment (optional)
◆ Cotton swabs
◆ Calligraphy pen and white ink
STEP BY STEP
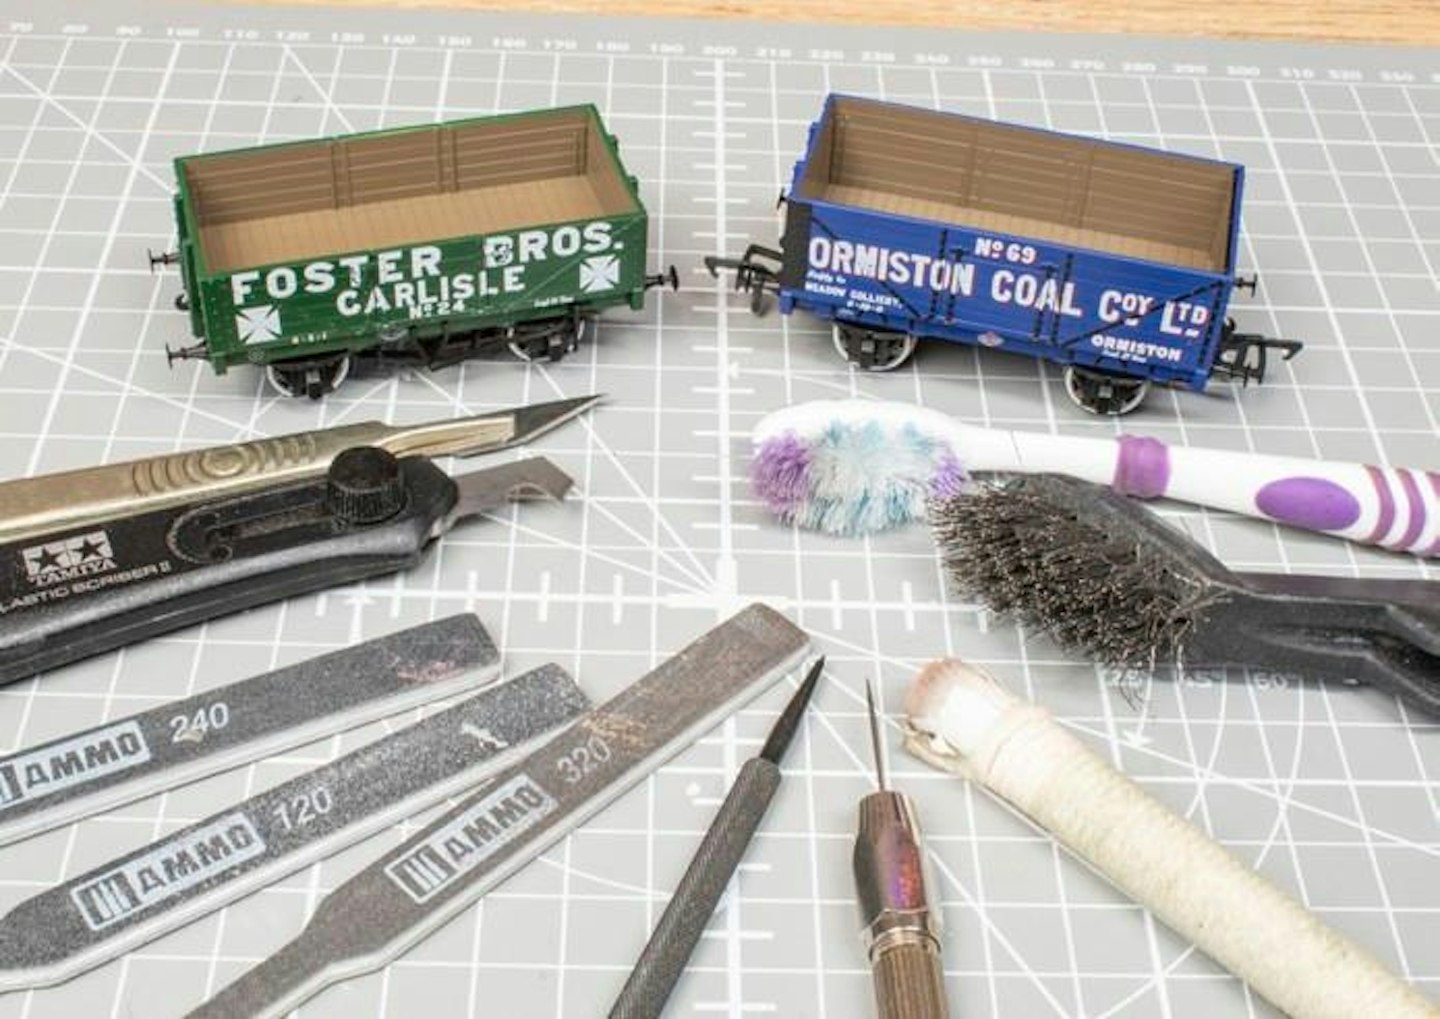
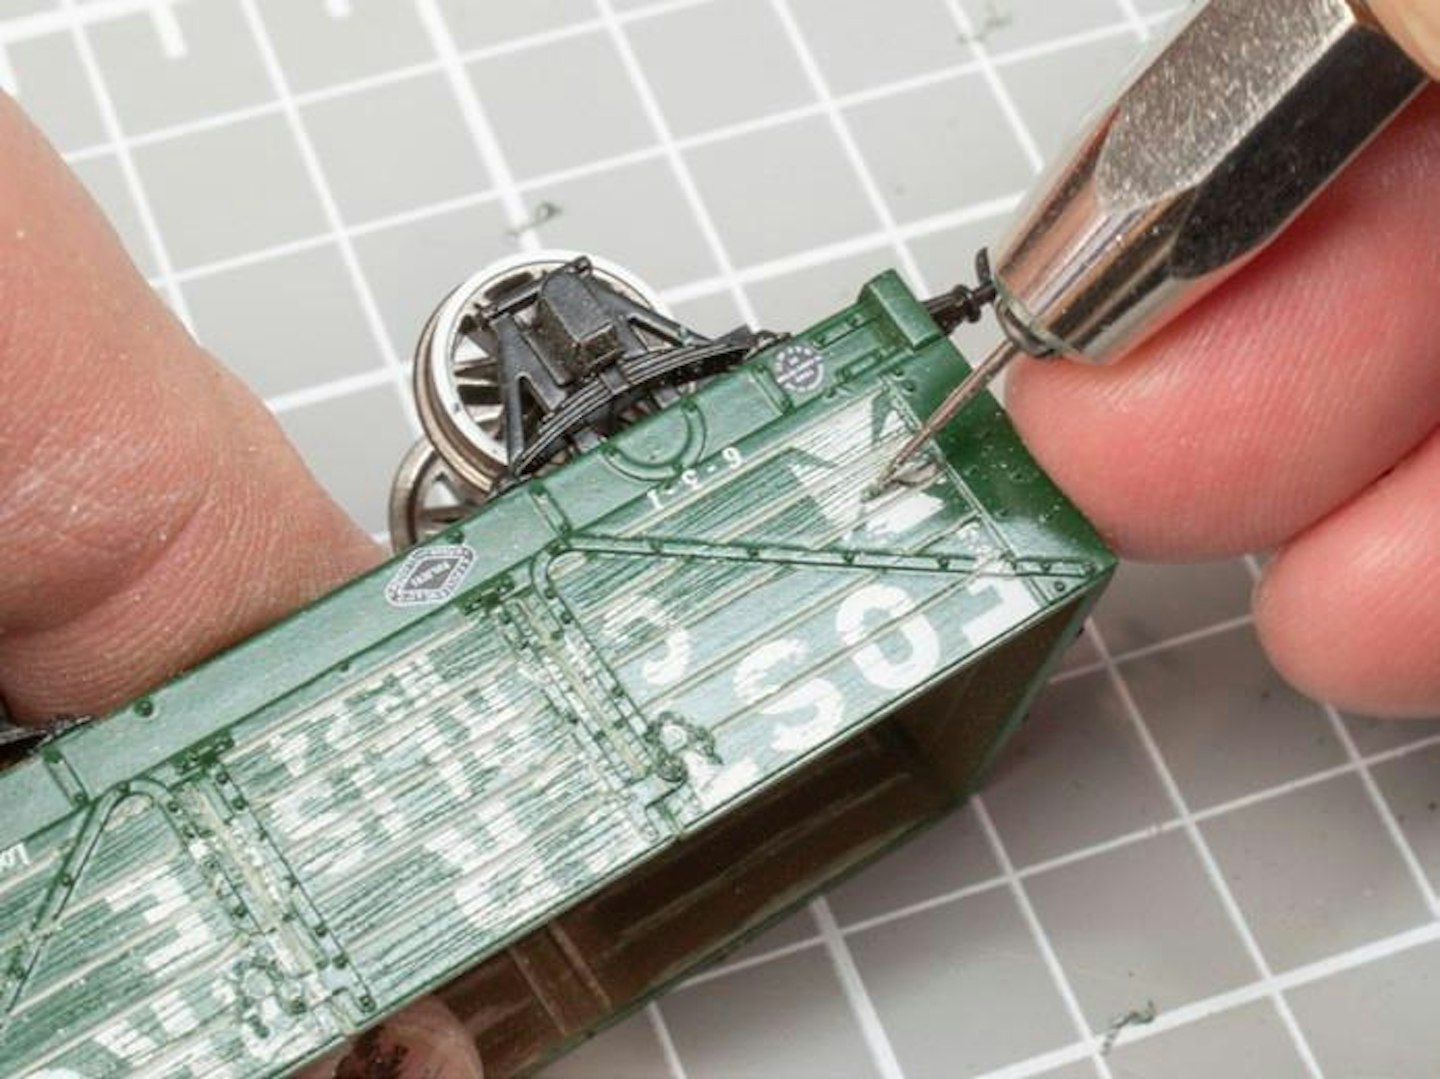
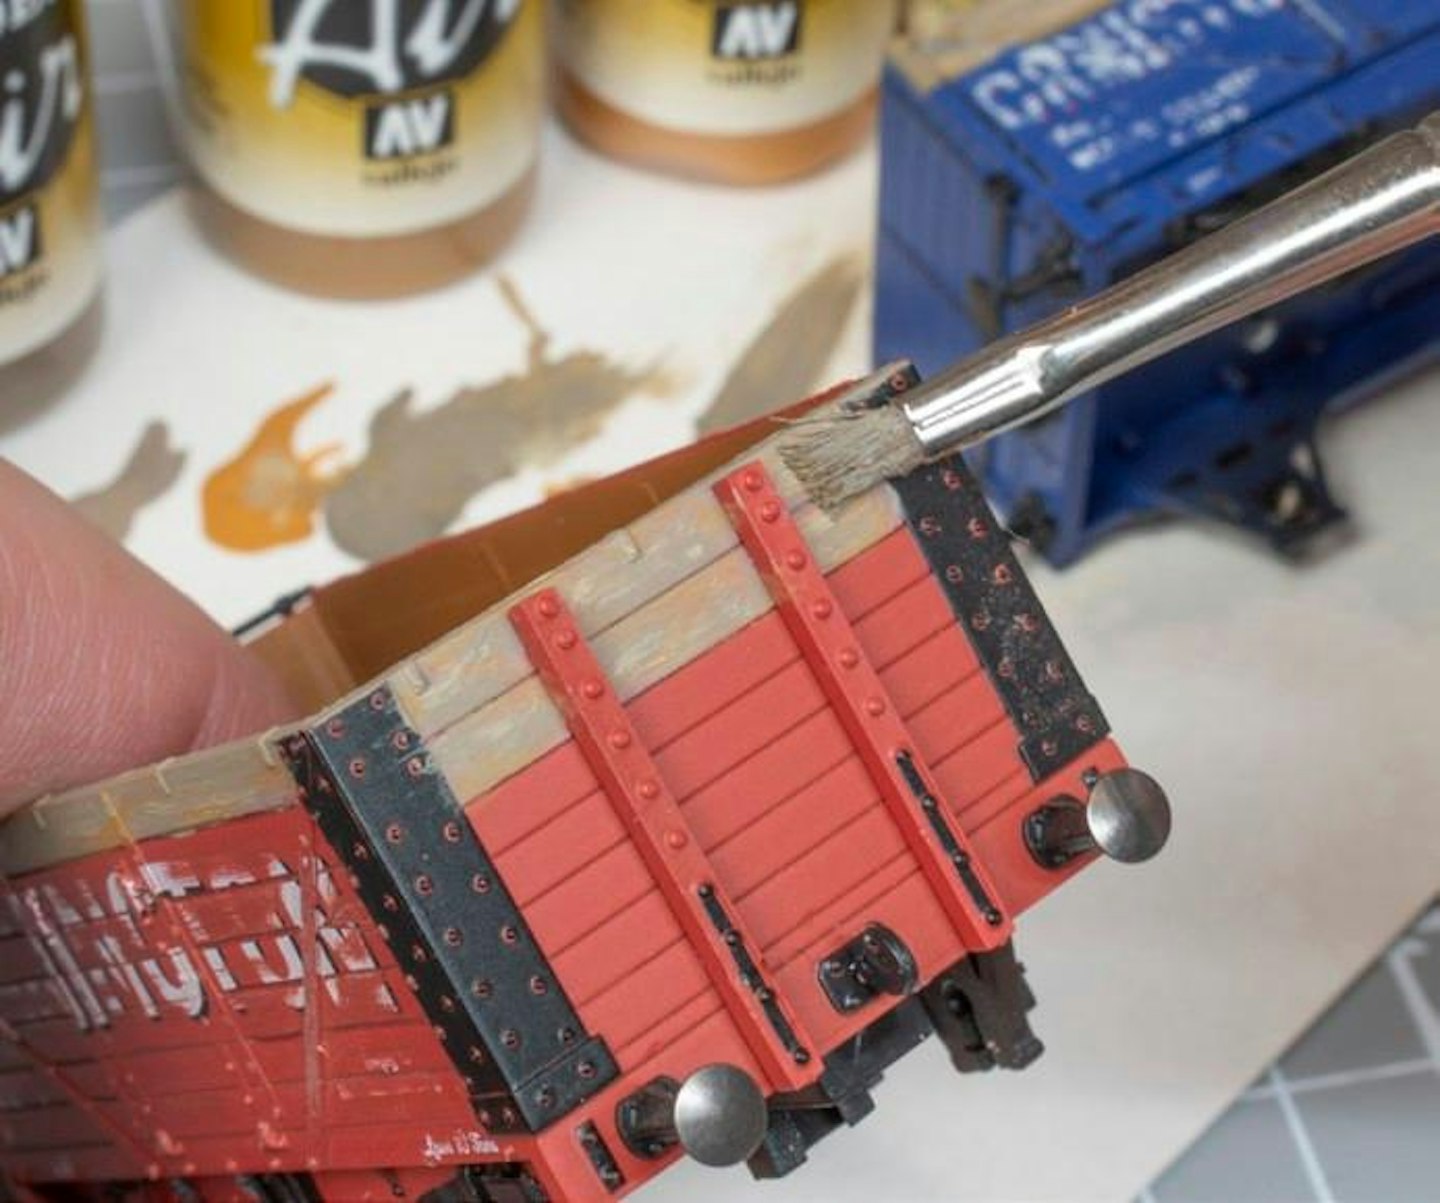
1 With a set of pristine private owner wagons to treat, only a basic set of tools was required for this job, with various abrasive strips, a profile cutting tool (with a fresh blade), a pin and miniature vice. A mini steel brush can also be handy.
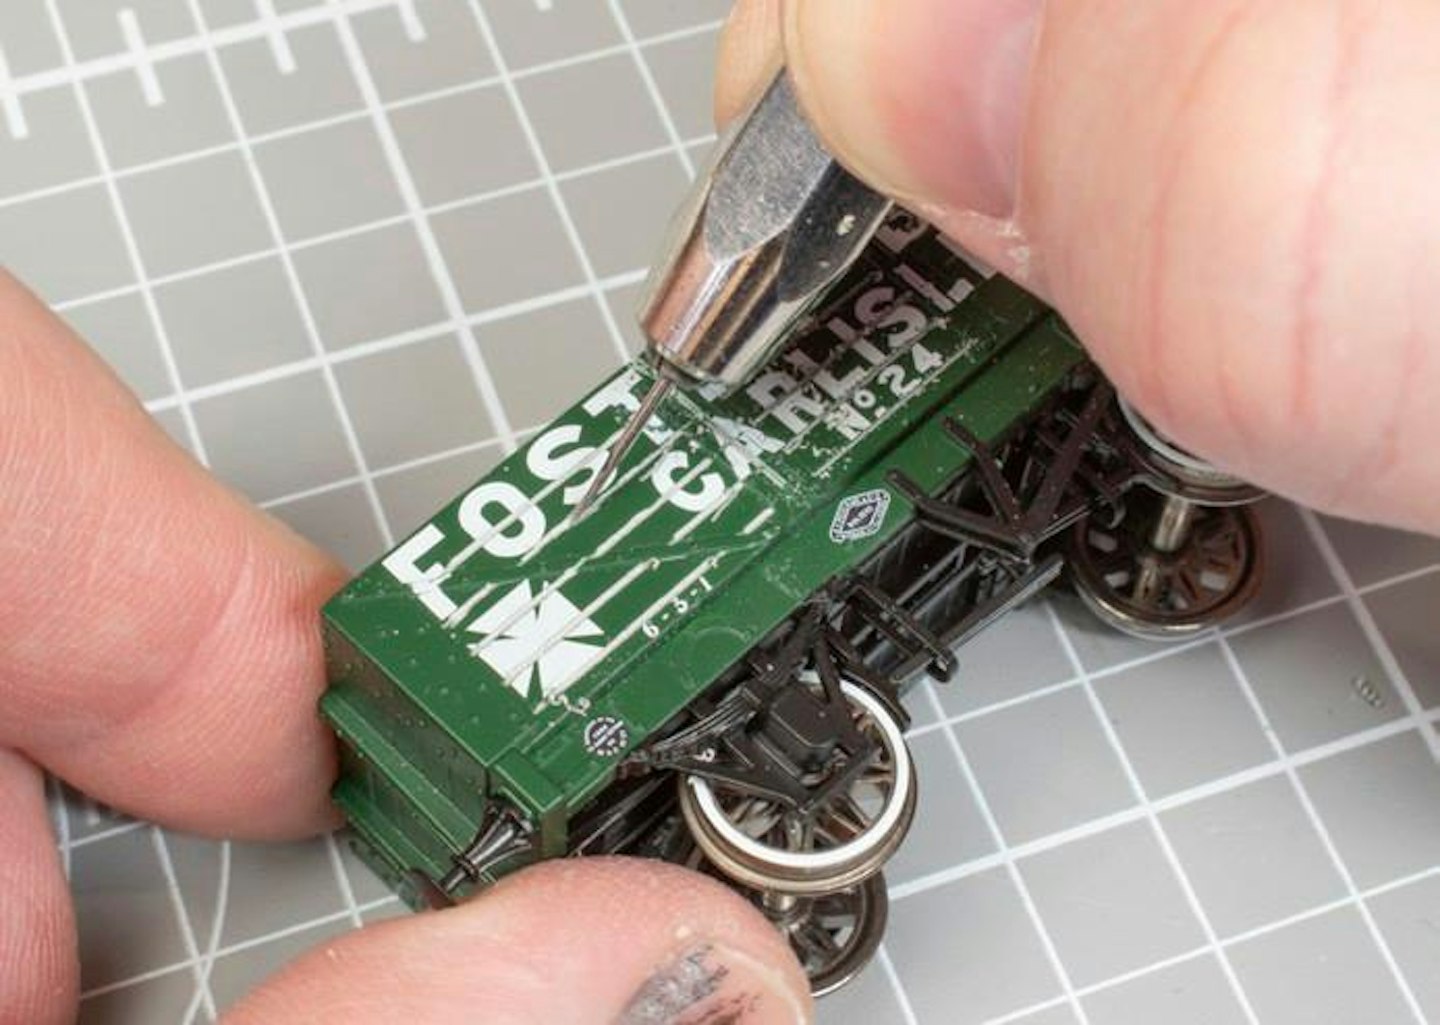
2 With an embroidery pin held firmly within a pin vice, I began scribing along the plank seams to dig slightly deeper and less uniform trenches, taking care to work around the various bodyside straps and raised door fittings.
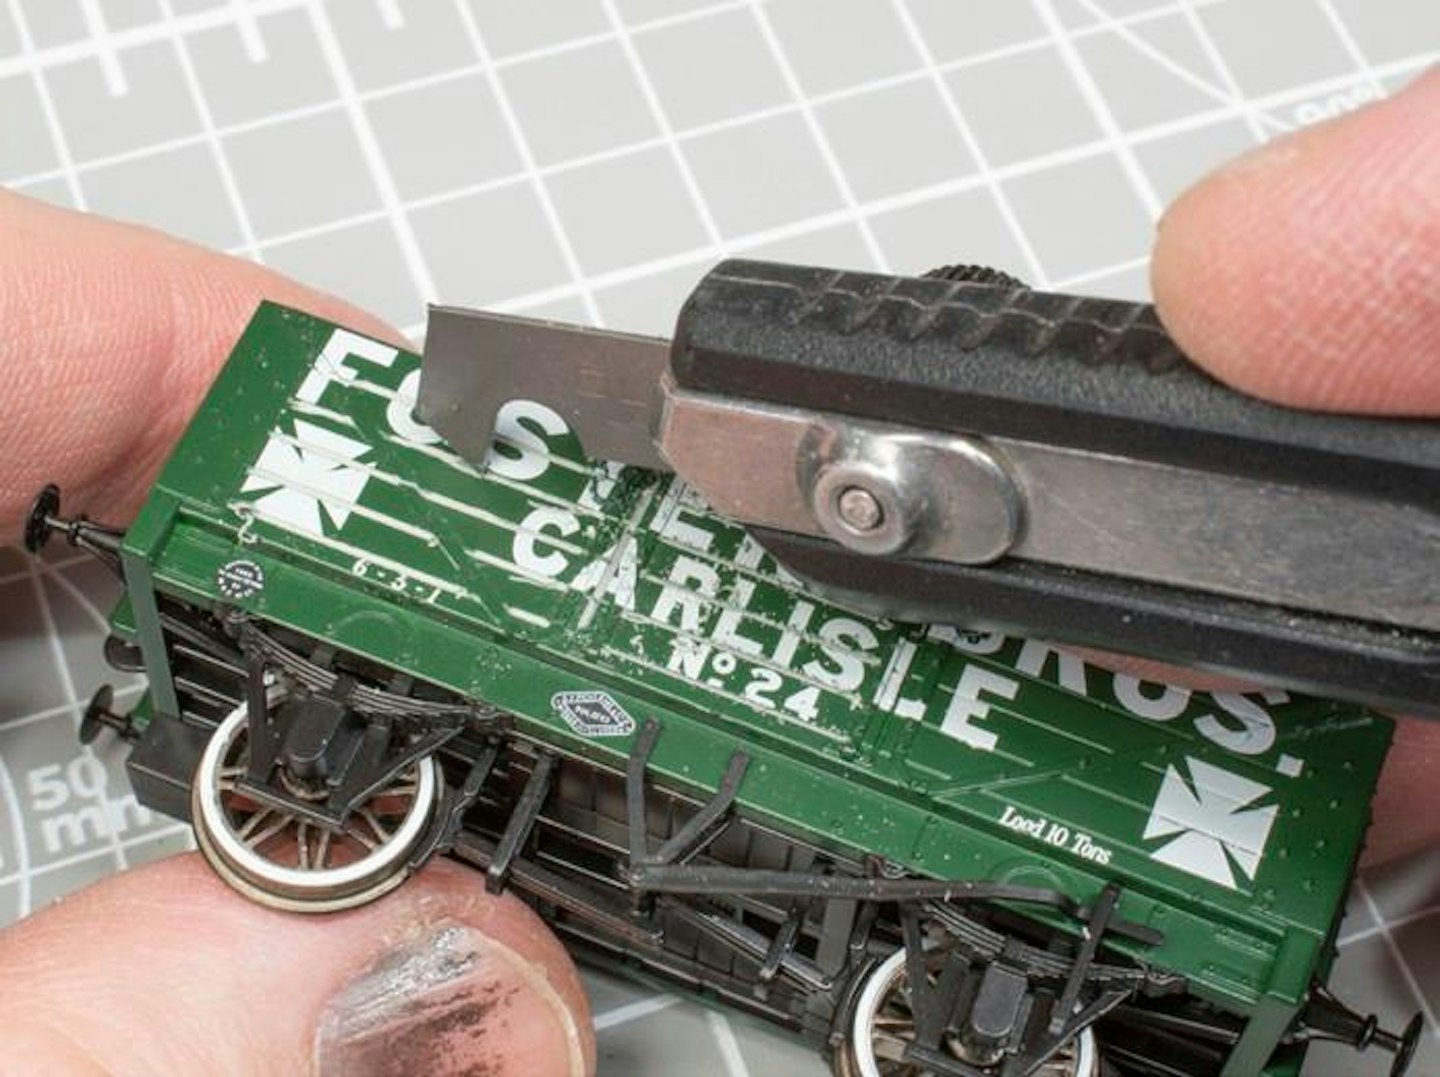
3 A profile cutter, with a hook-type blade designed to be drawn towards the user, can be gently run along the plank seams to deepen them. Again, work up to the raised detail and take care to keep the blade on course.
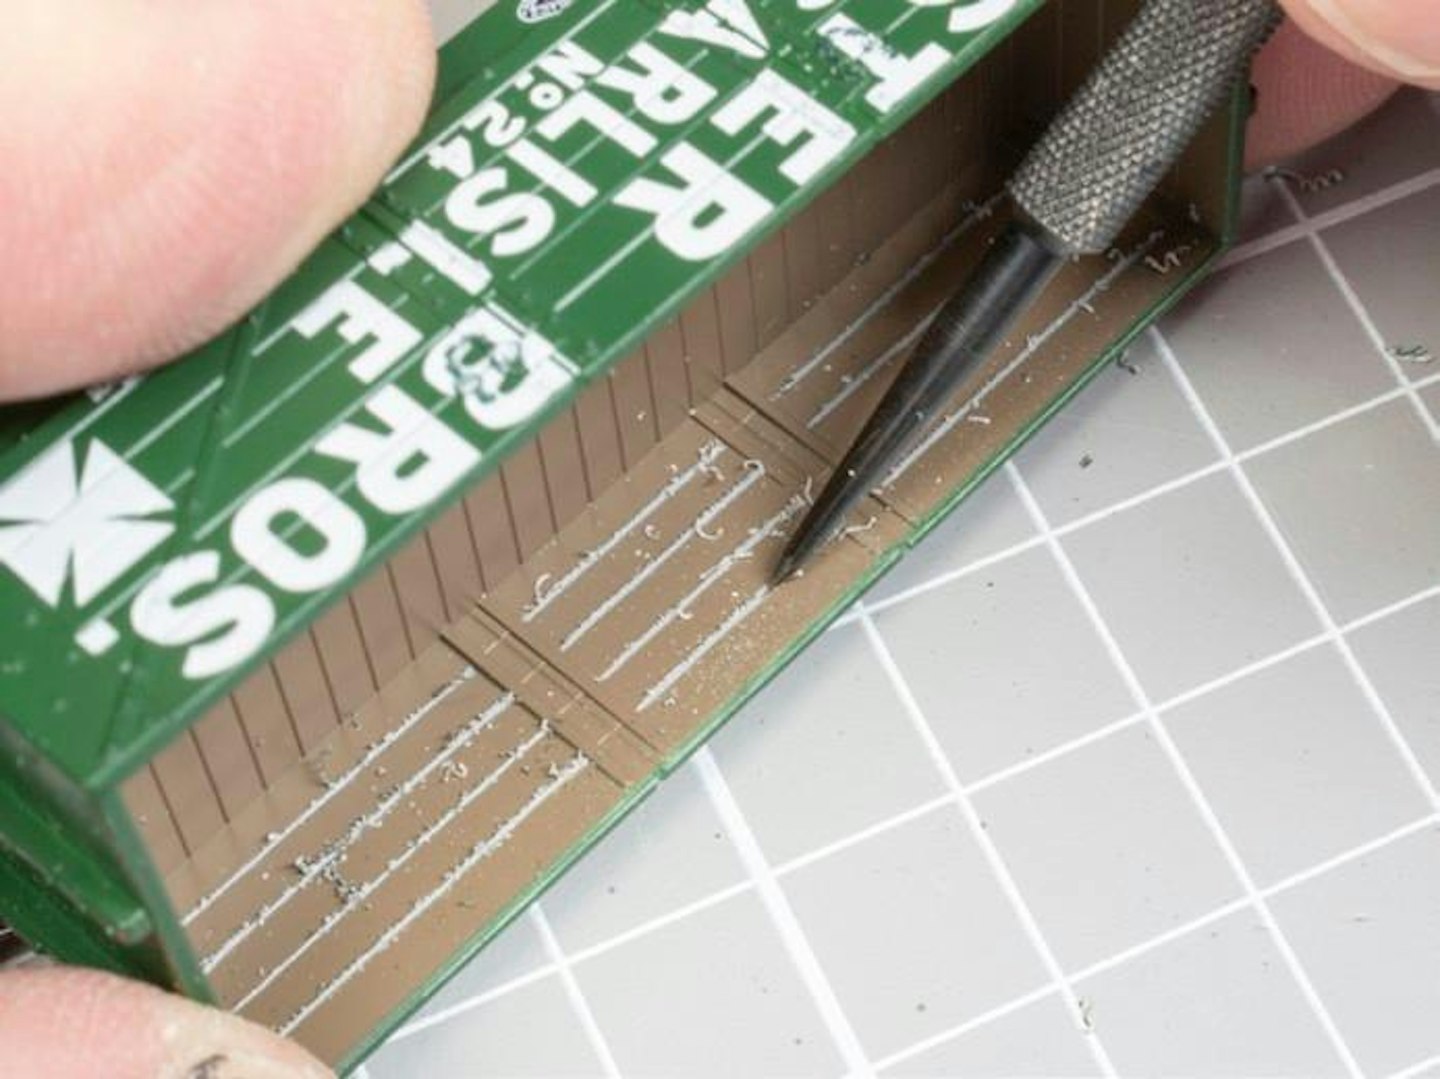
4 After treating the exterior planks, I continued onto the interior too. I tried using a fine scribing tool, which was a little less bulky than the pin vice, making it easier to work within the inside of the wagon.
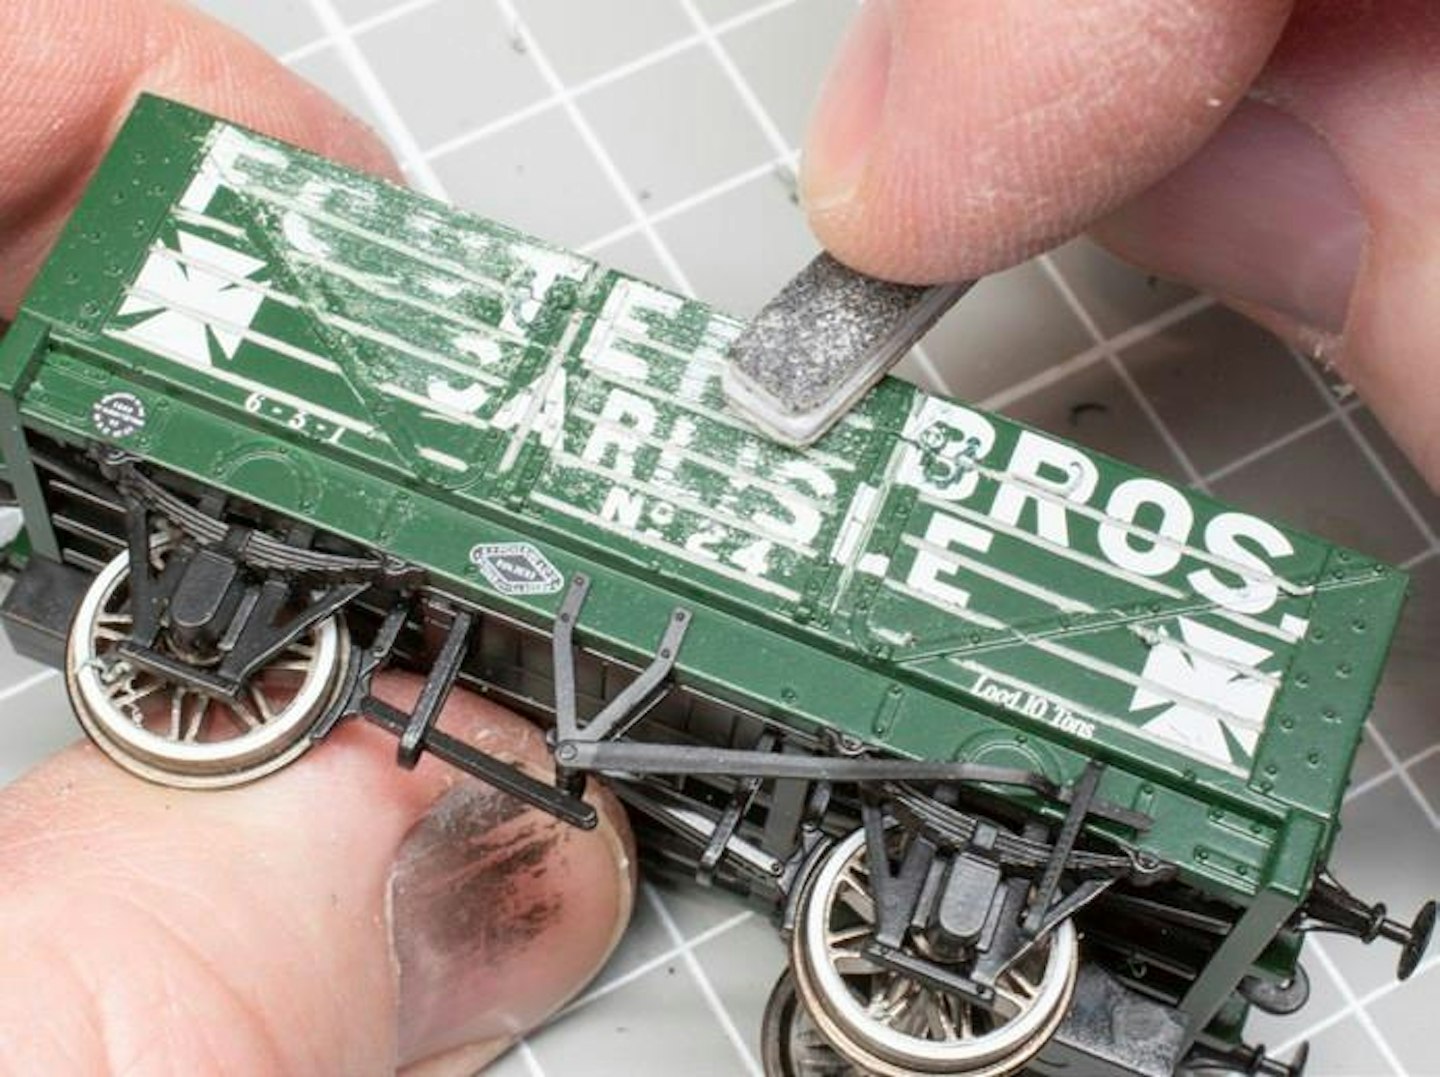
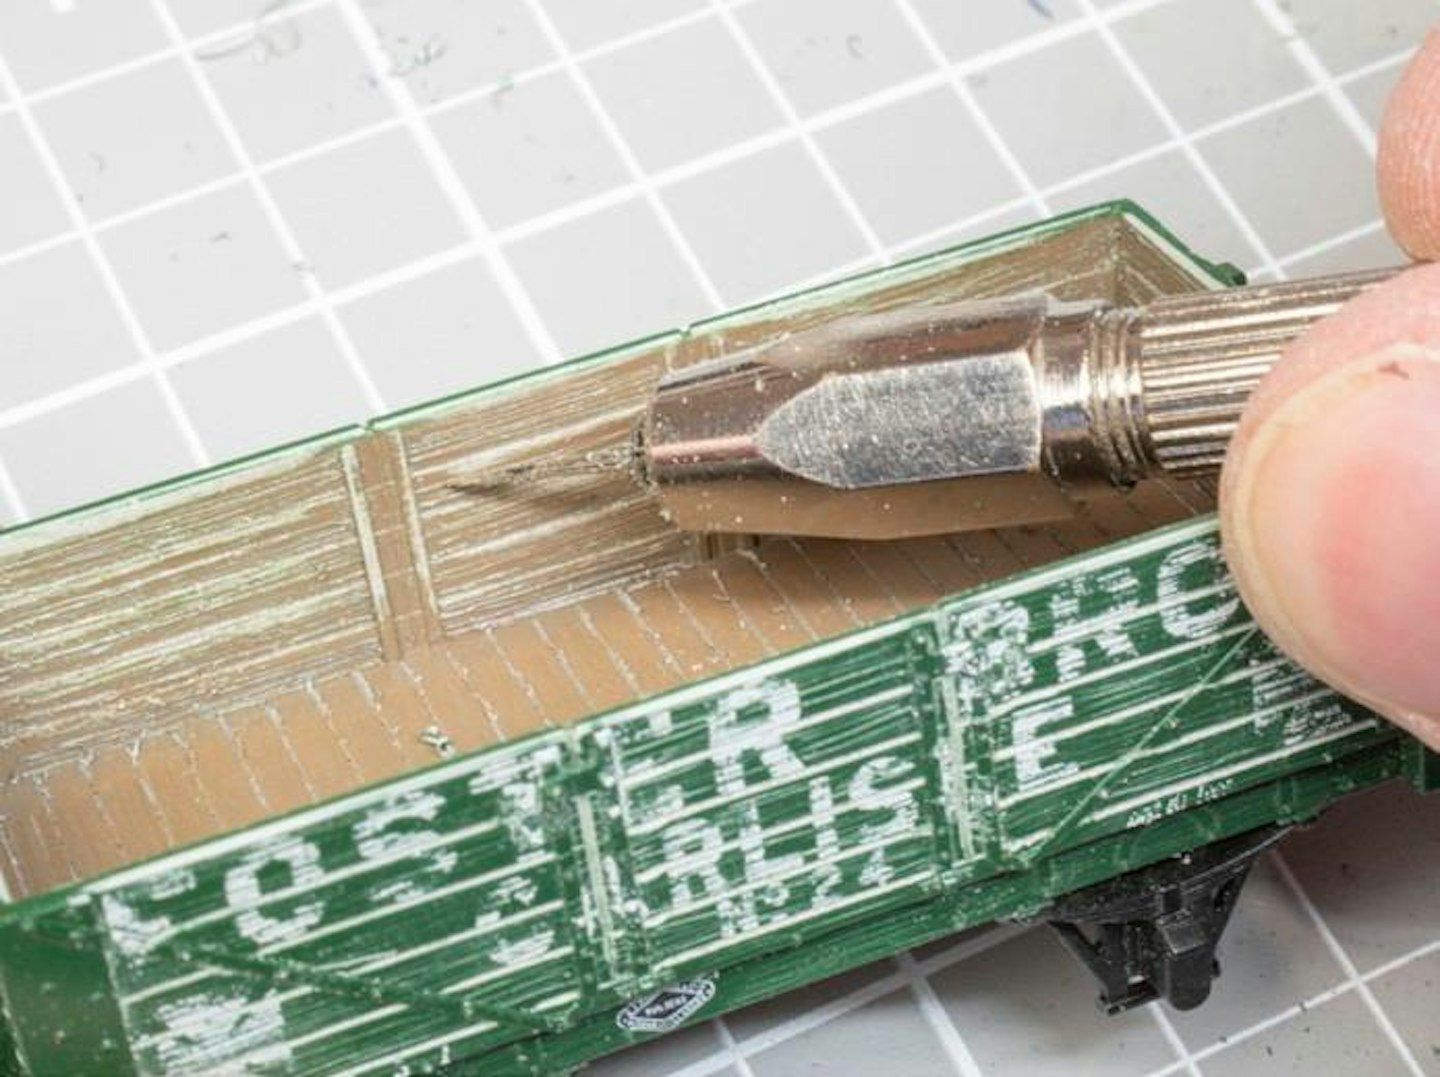
5 After brushing away debris, a 150grit abrasive pad was rubbed very lightly along the length of each plank (not vertically). As well as removing much of the printed logos, the abrasive also imparts a rough texture akin to timber grain.
6 I repeated the process with 240grit and 320grit abrasive pads, again working lengthways along each plank, with the minimum of pressure, removing much of the printed legends. I then began scribing more severe grain texture.
7 As before, I worked along the length of each plank, applying moderate pressure. Much of the scribing cuts into the layers of paint rather than the plastic below, which proved adequate later, although experimentation is recommended.
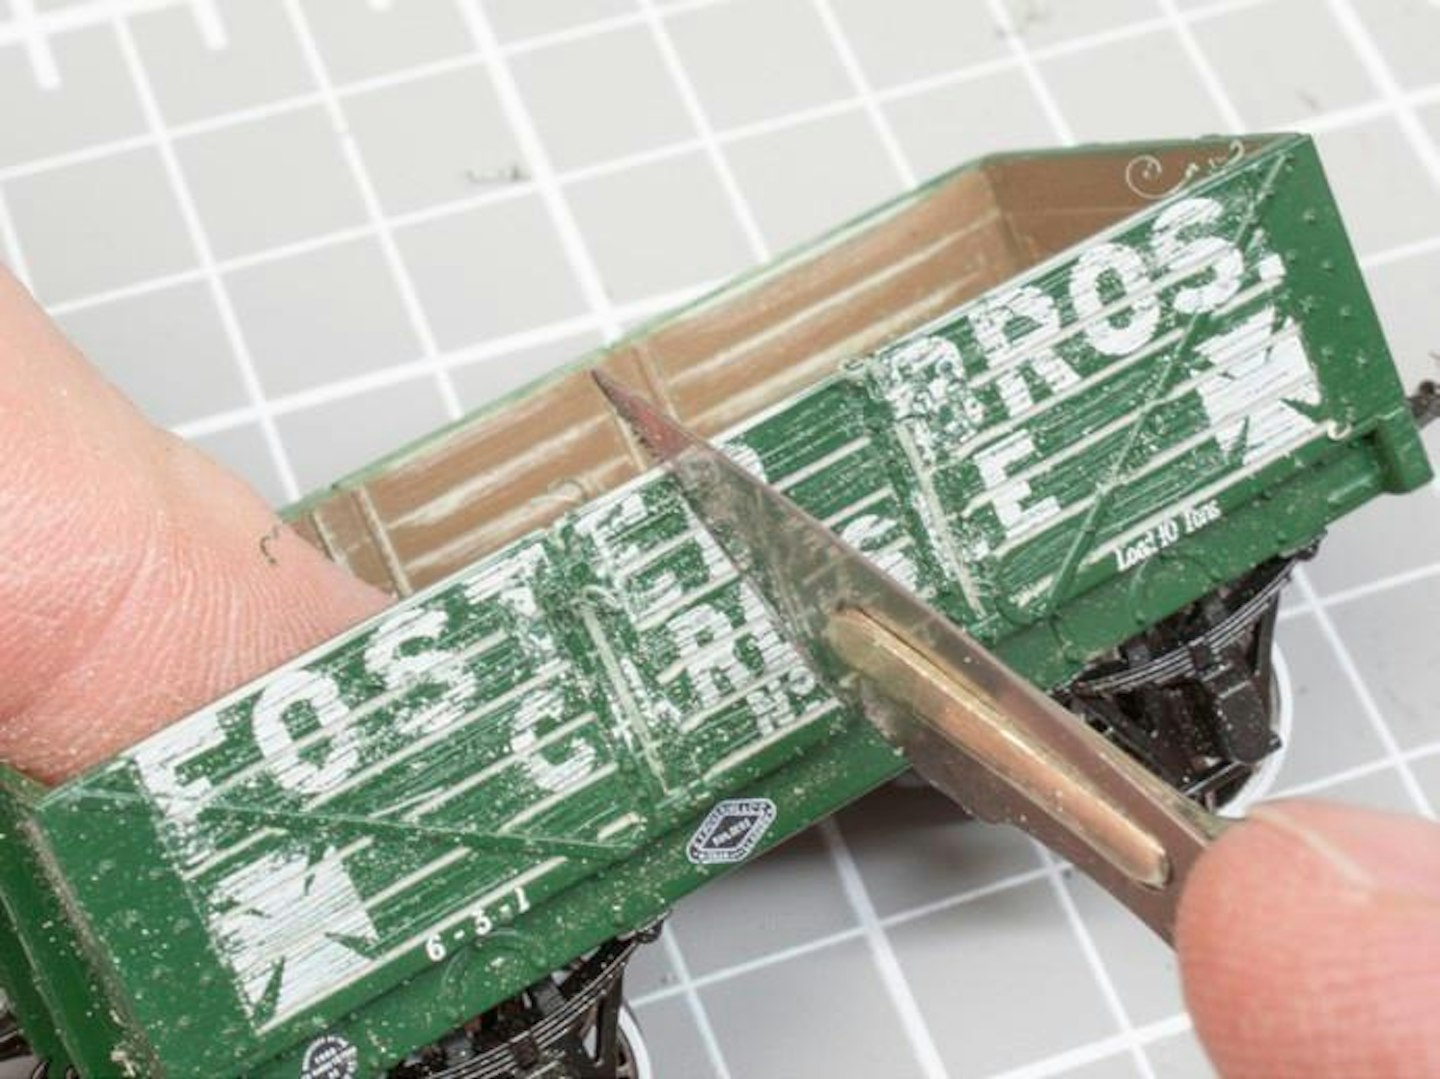
8 To remove the perfect profile of the upper planks, I ran the edge of a sharp scalpel blade along the inner and outer faces, altering the angle as I went. Remember that we’re trying to avoid an overly uniform appearance.
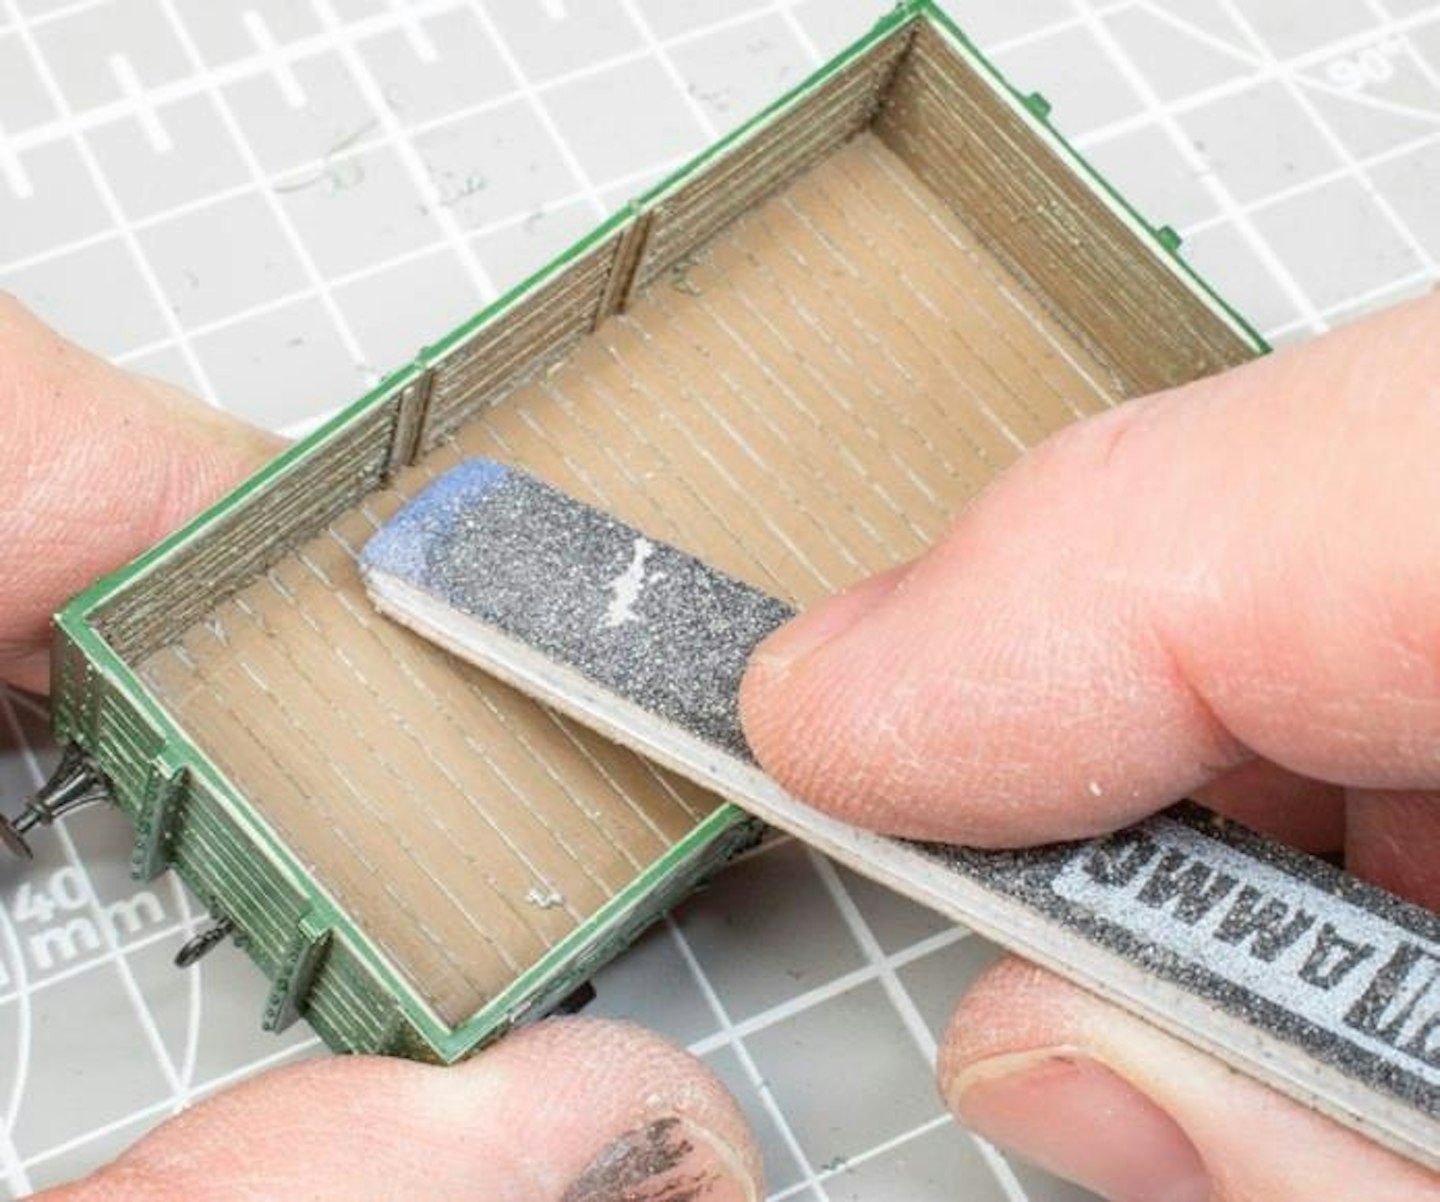
9 The distressing stages created a very rough texture which was ameliorated slightly with the abrasive pads, working along the planks, inside and out. Work gently to avoid flattening the texture and take care around raised detail relief.

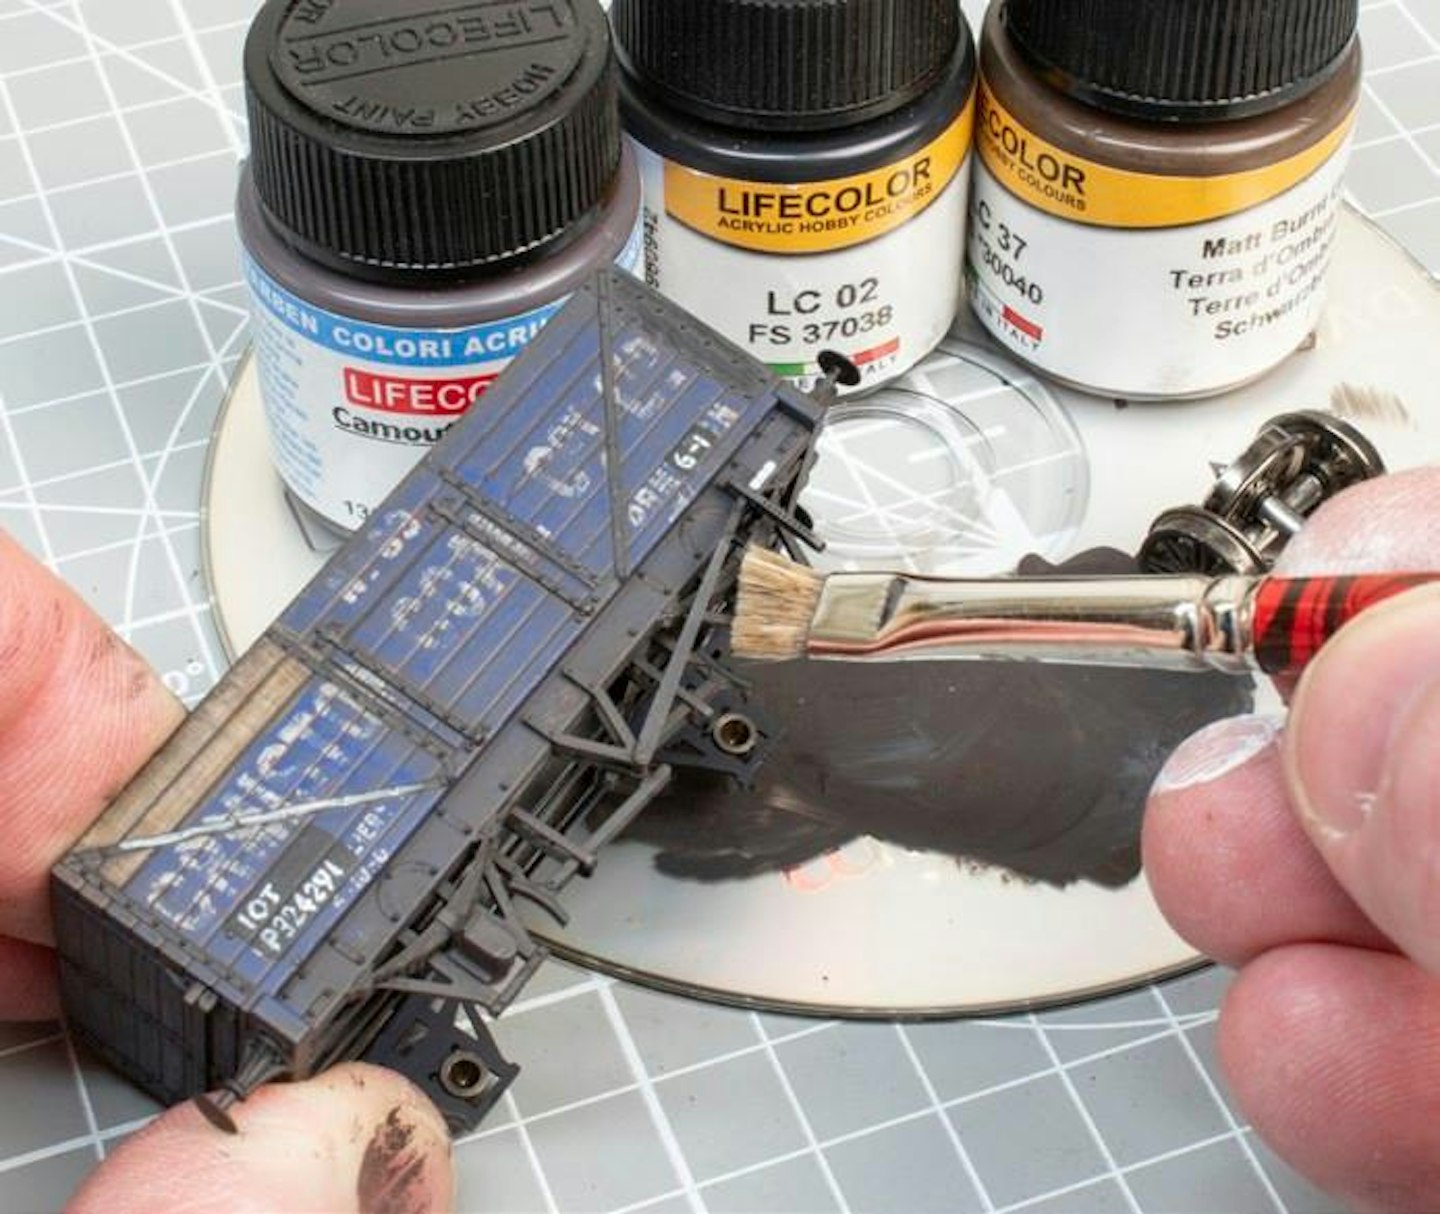
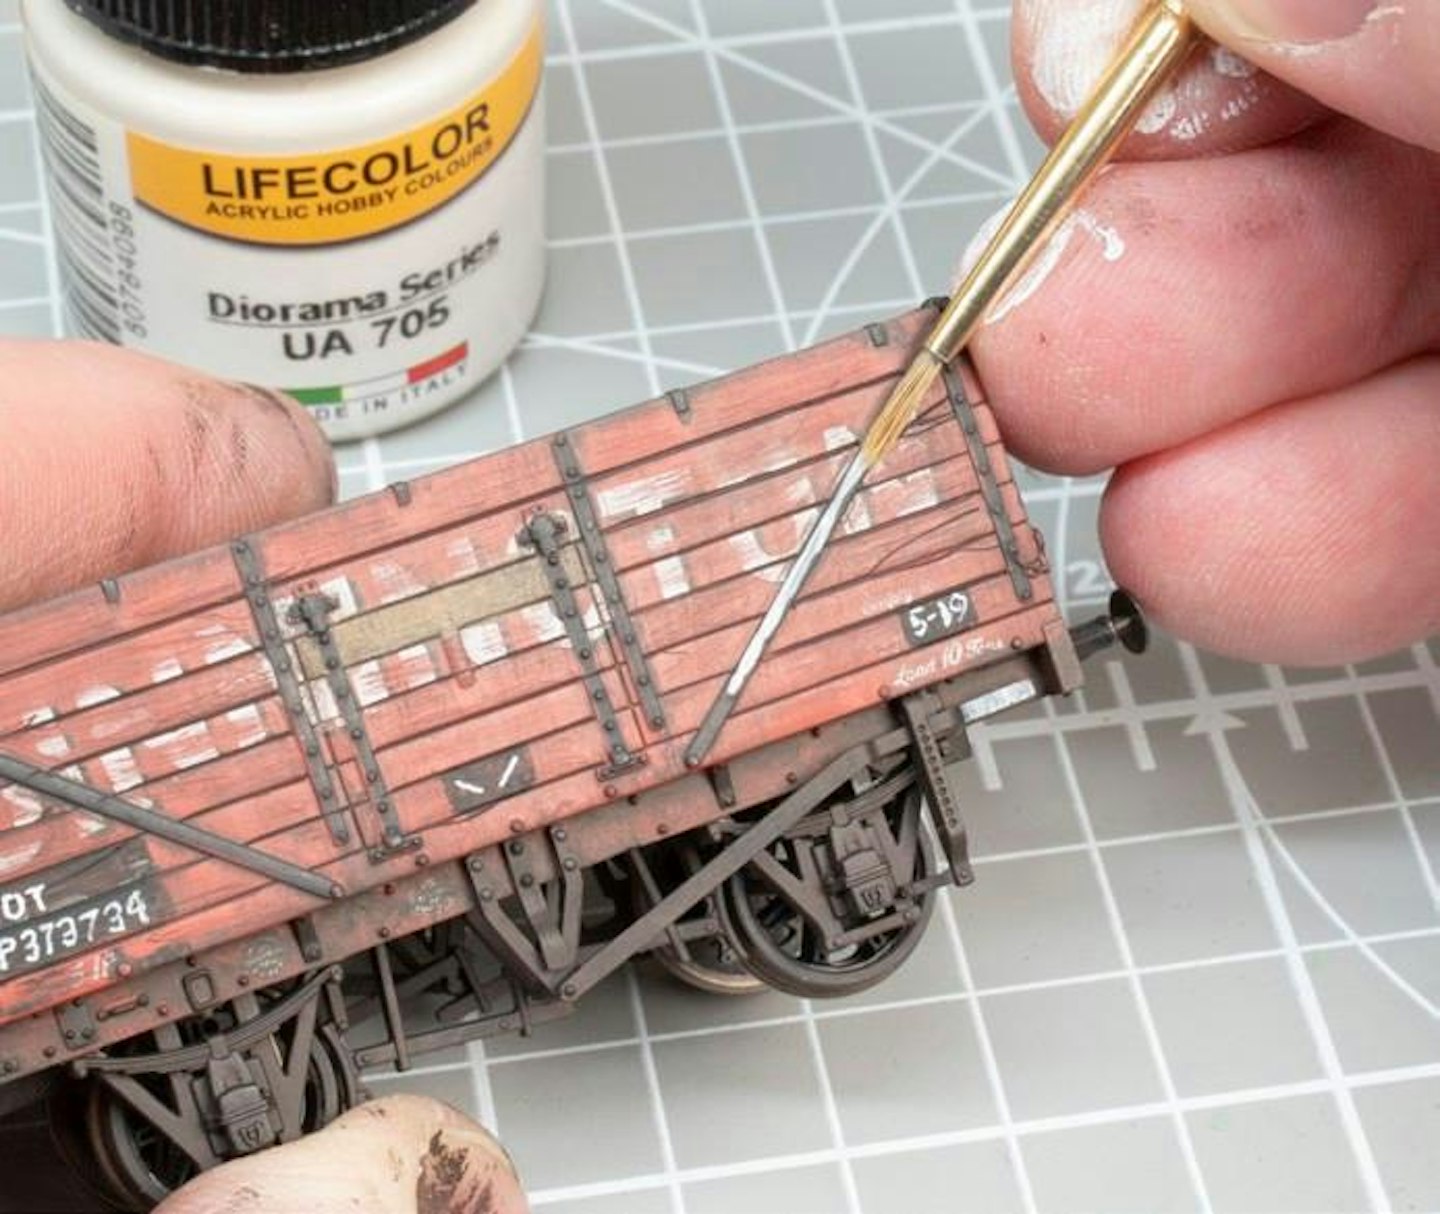
10 With the physical distressing complete, the wagons were cleaned before the painting began. First job was to mimic the addition of unpainted and weather-worn replacement planks. A set of Vallejo paints was employed.
11 The paint set (see Shopping List) provides six different paint shades, plus a surface primer and a dark grey wash. The shades were built up in random layers, running the brush along the planks to reinforce the grain texture.
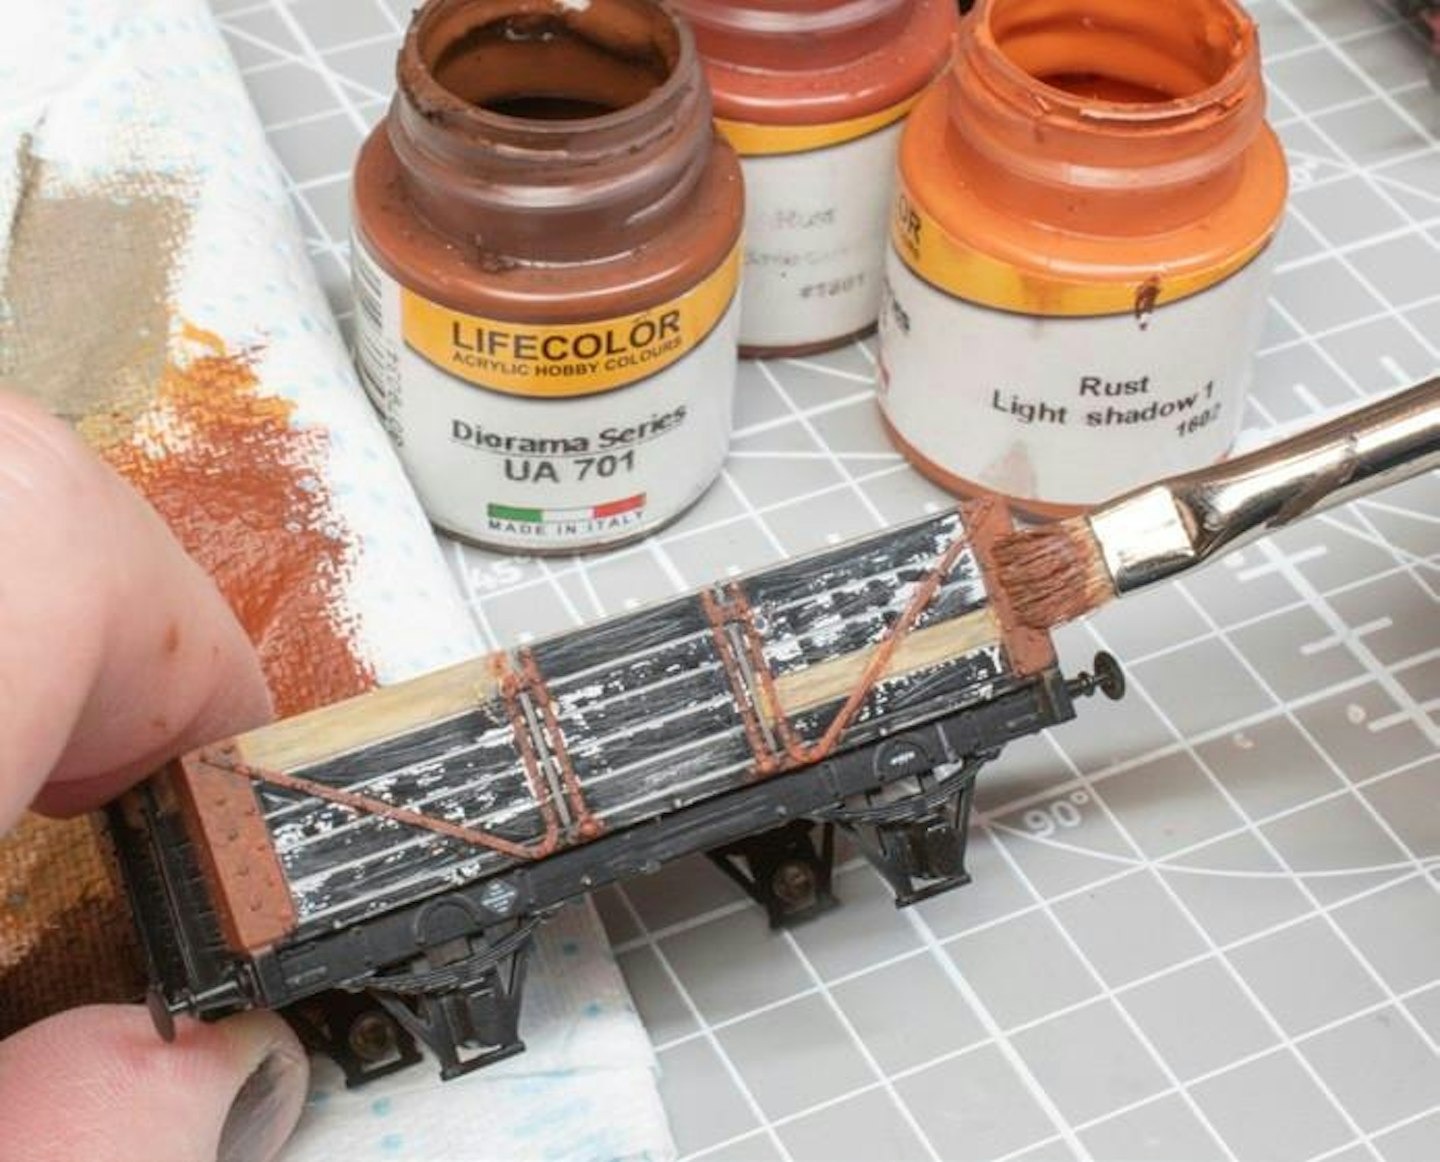
12 It took a short while to treat the bare timber planks (not forgetting the interior too). Next job was to touch in the iron strapping and plates. Here, I’m stippling layers of rust-coloured paints with a flat brush to gain a random texture.
13 Commonly, the strapping would be given a coat of protective paint during repairs, so other wagons gained a very dark grey shade (rather than black), applied carefully with a fine brush. It doesn’t have to be perfect.
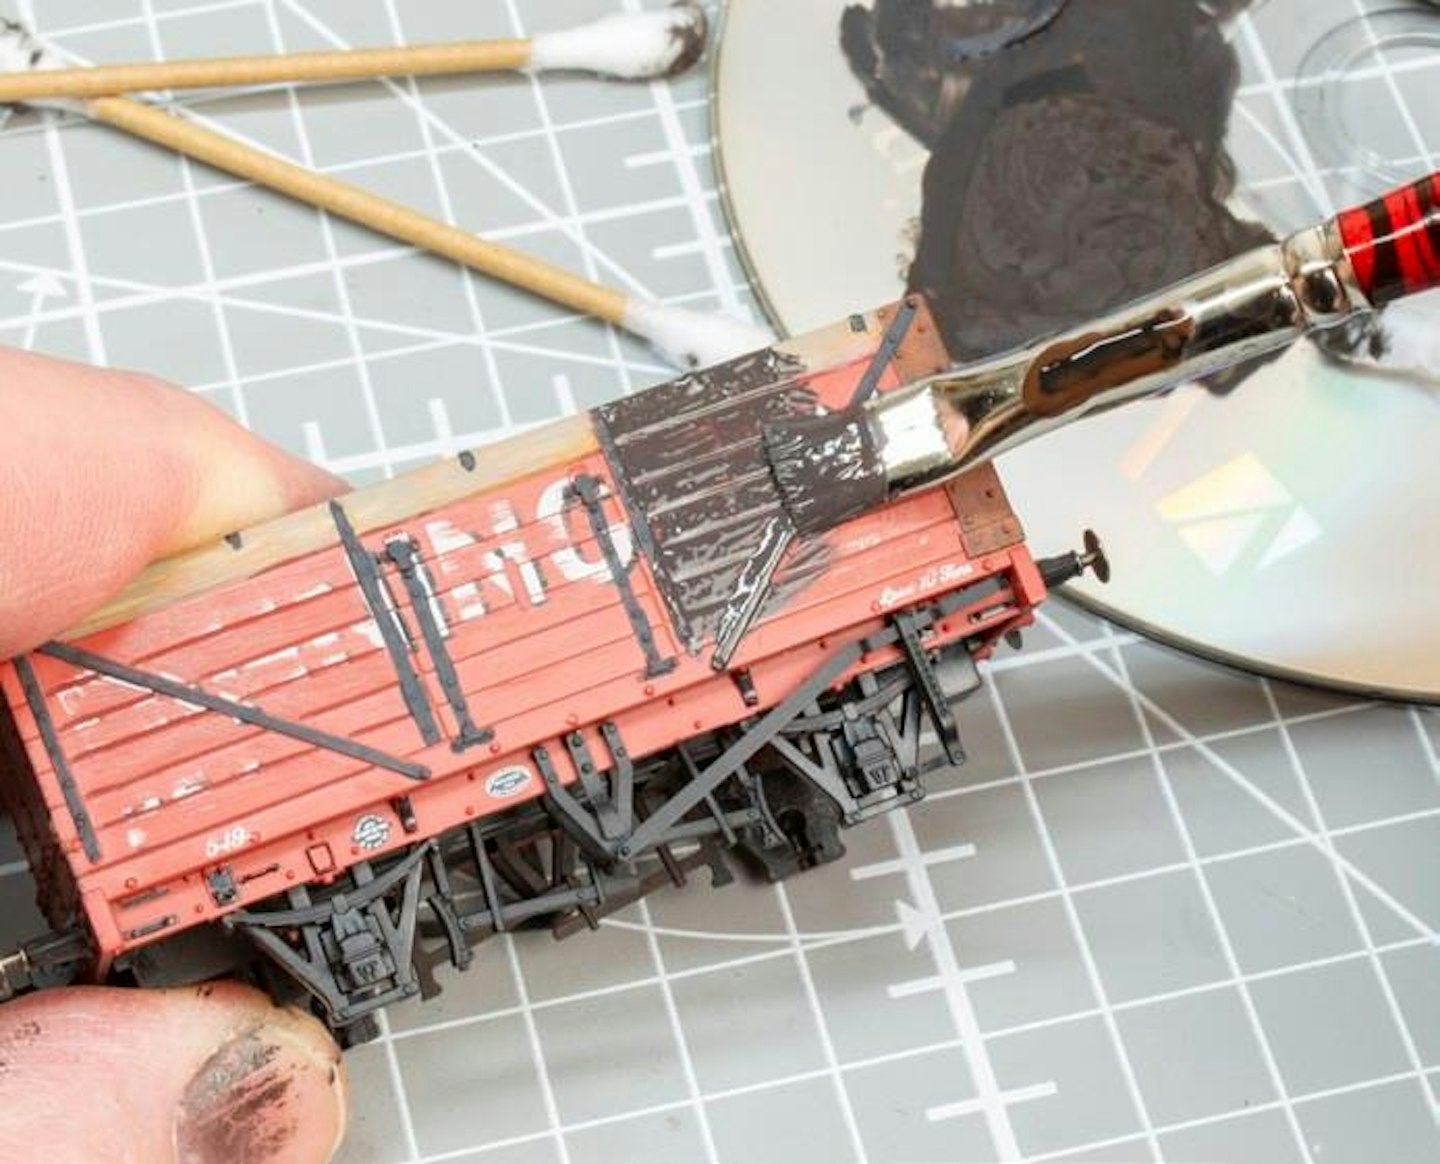
14 The painted planks and strapping were allowed a few hours to dry before the weathering began. A blend of black, brown and dark grey acrylic paint was brushed onto one section of the wagon, working it into the plank seams.
15 Immediately, a cotton swab wiped most of the paint away, working in vertical strokes. This left the grimy paint within the recessed areas and around raised detail. Dipping the swab in acrylic thinners helped shift stubborn traces.
16 Having worked around the exterior of the body, repeating the brush-on-wipe-offprocess, the same paint mix was stippled onto the chassis frames and brake gear. Some of it can be dabbed away with a swab, but I left it alone.
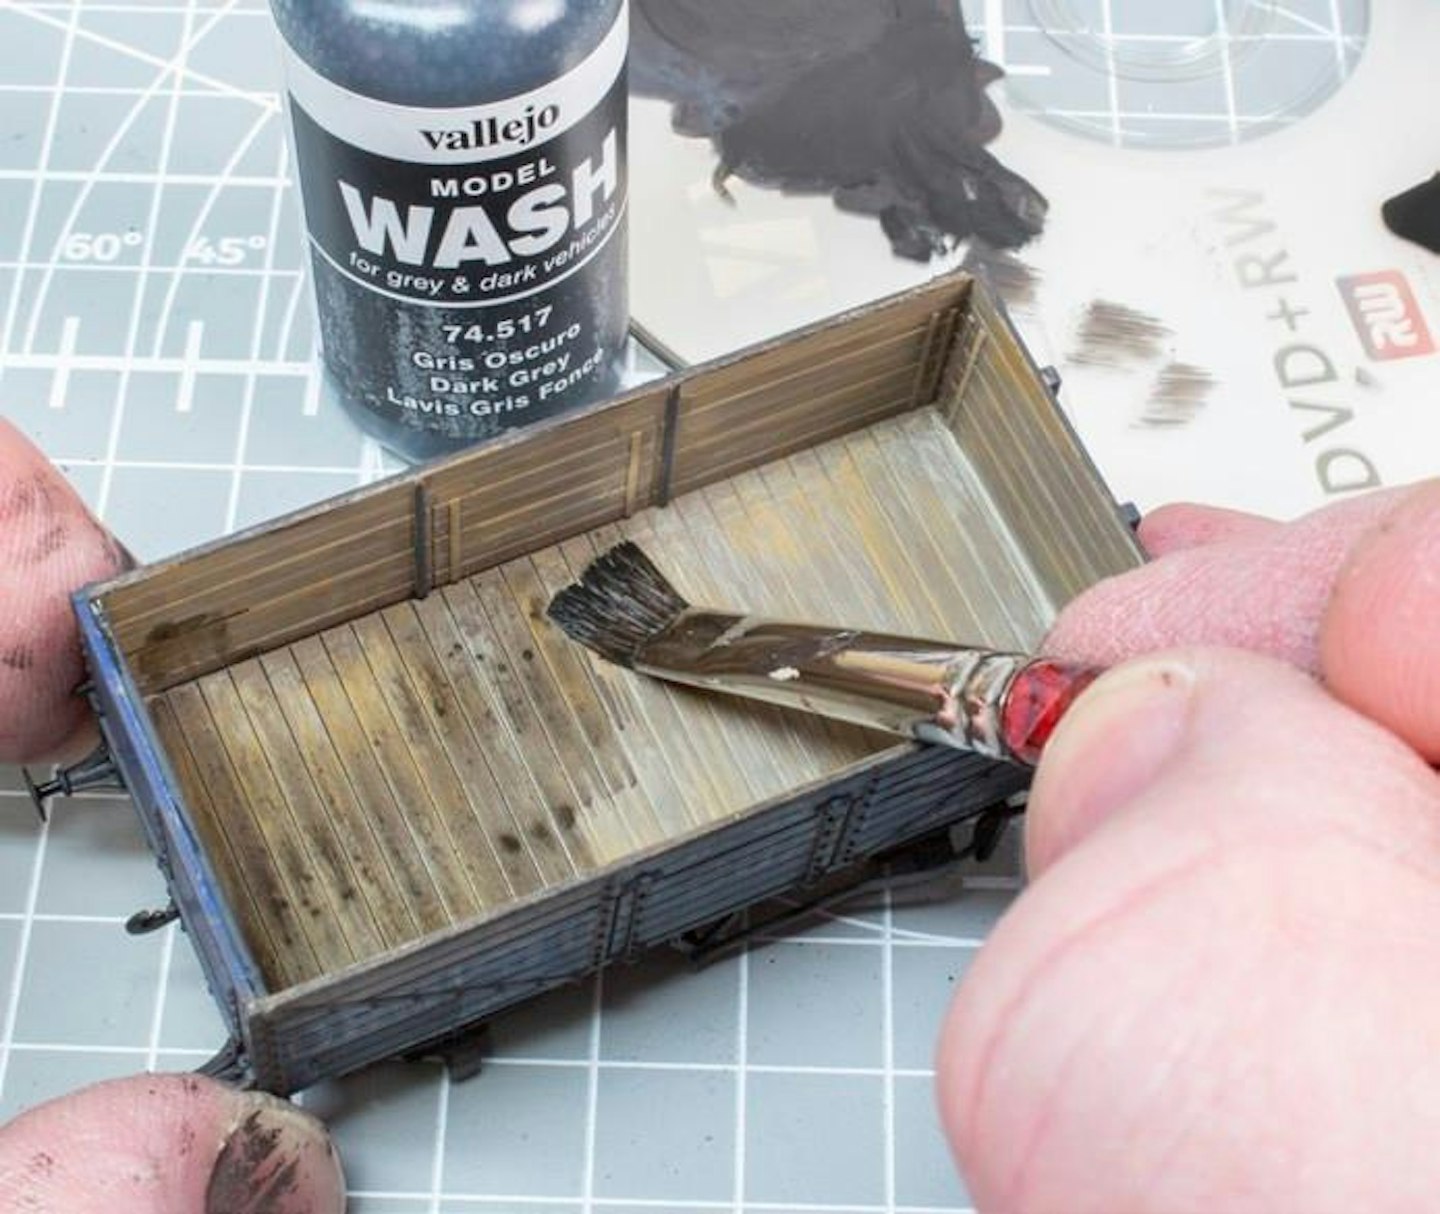
17 After dry-brushing the interiors with the various Vallejo wood shades (working a flat brush along the planks), the dark wash from the same pack was brushed over the surface, allowing it to settle between the planks.
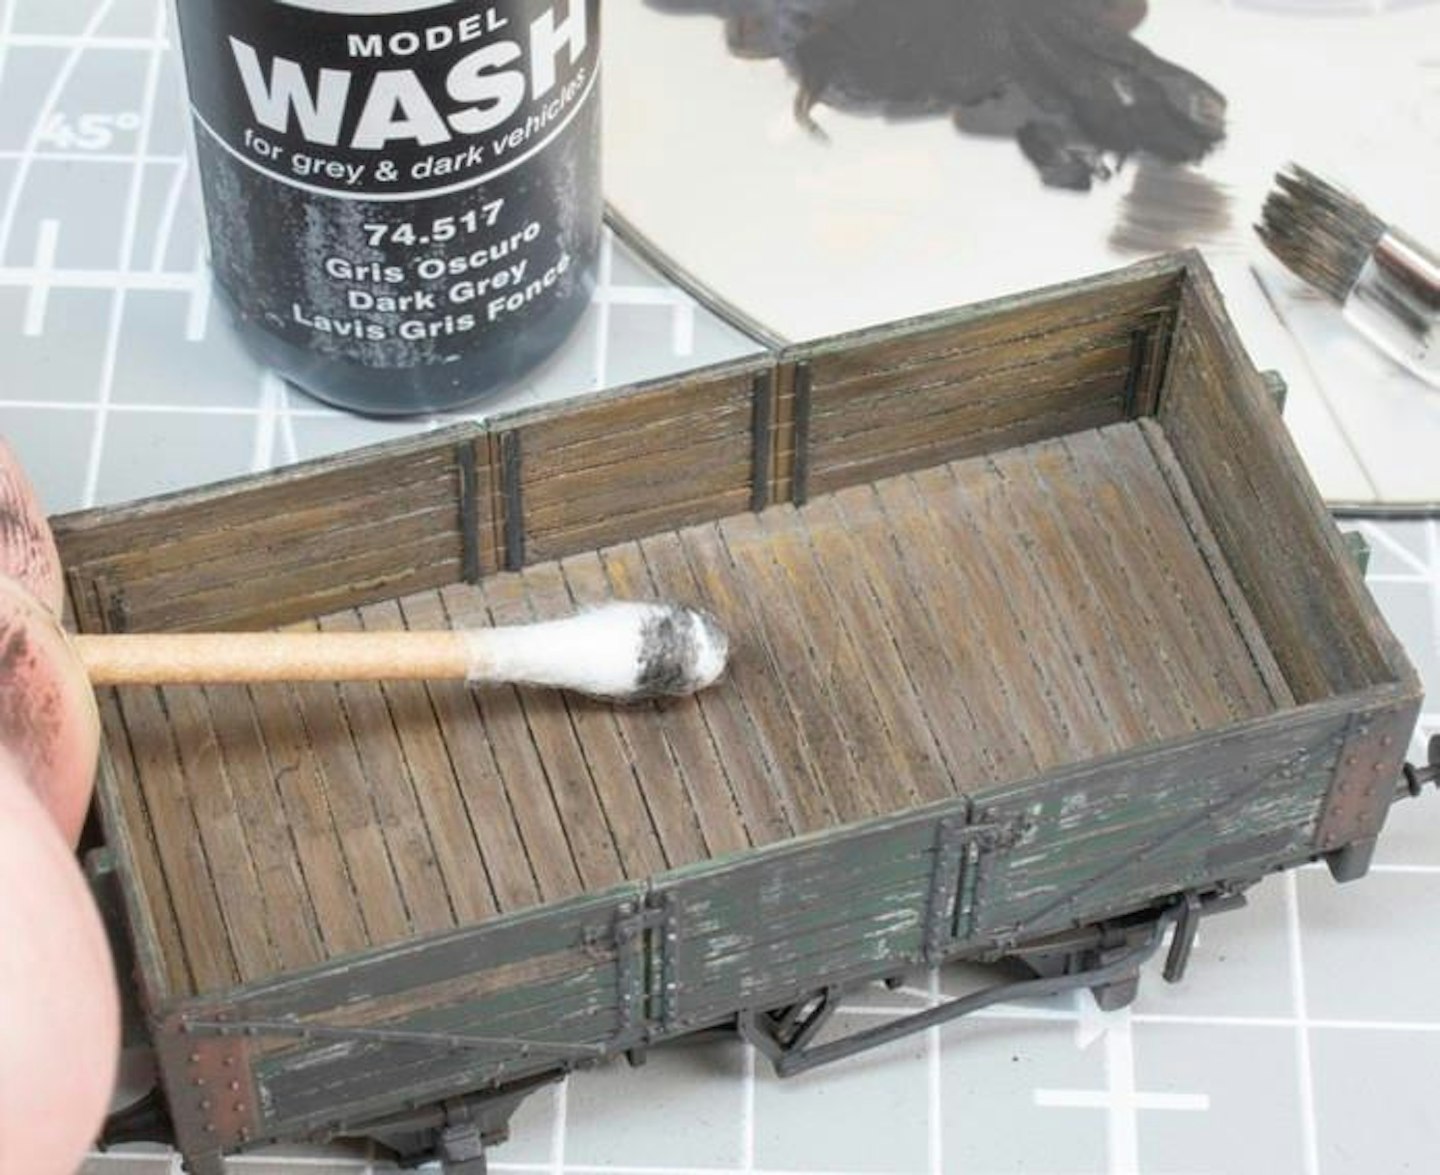
18 Gently brush the thin wash evenly along the planks and allow to dry. Any areas where an excess of wash has pooled can be absorbed with a cotton swab. Already, the dark plank seams help bring the interior to life.
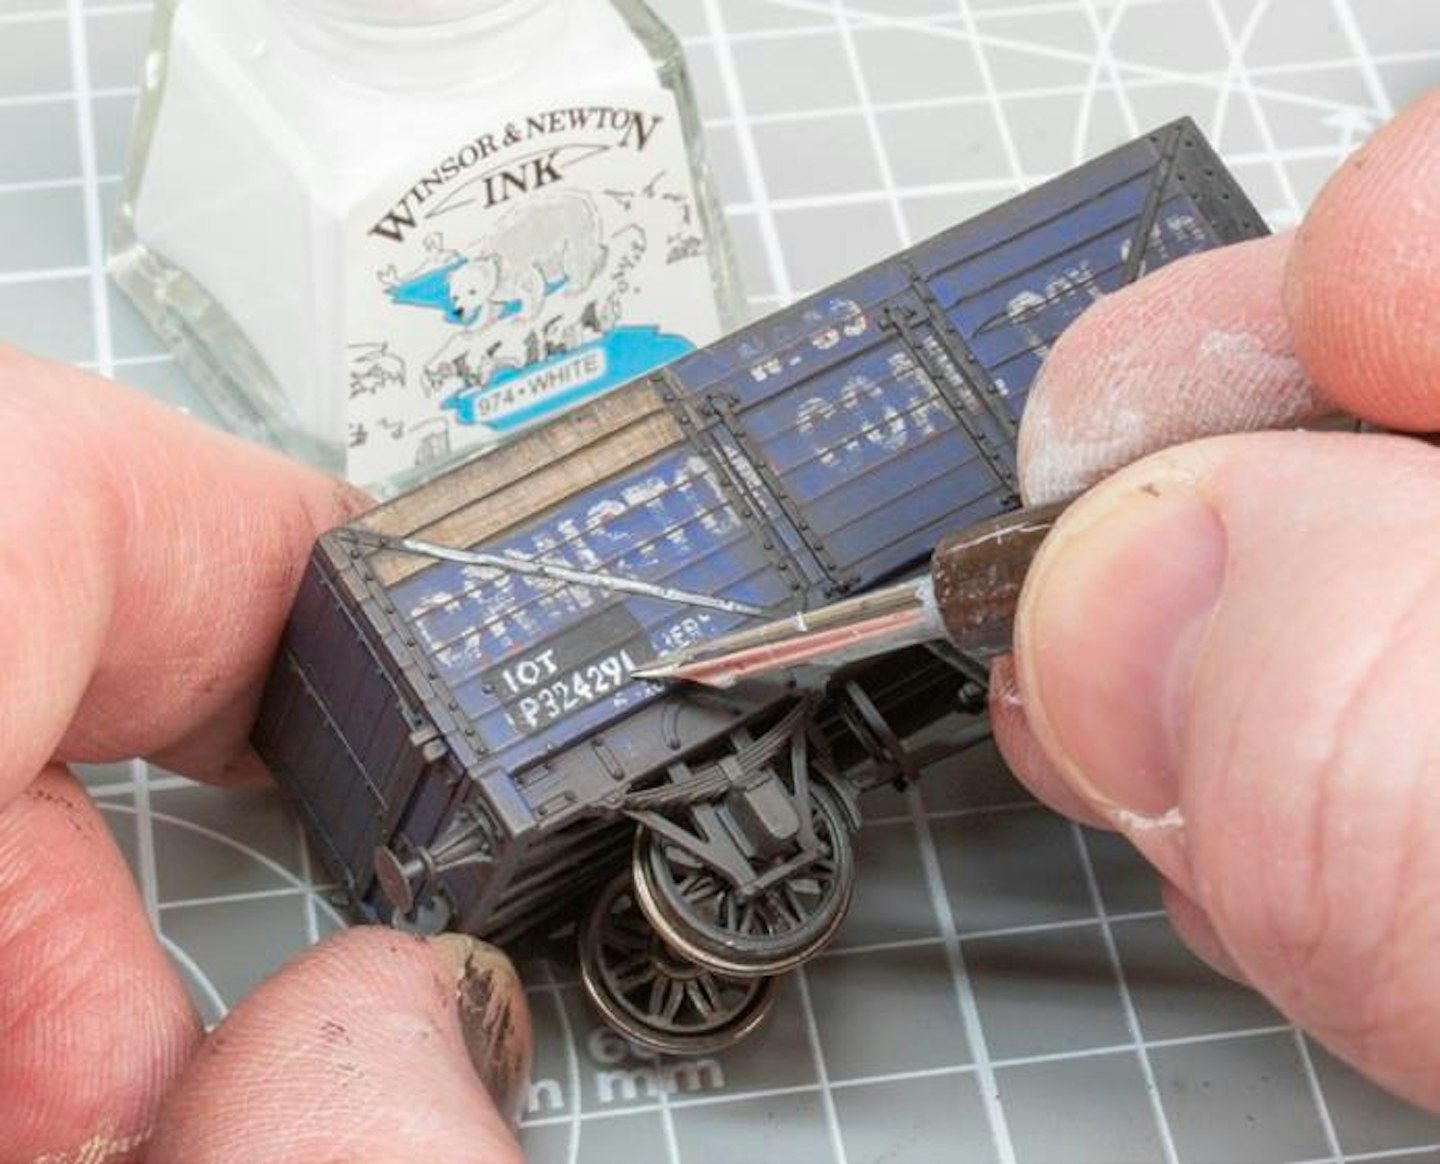
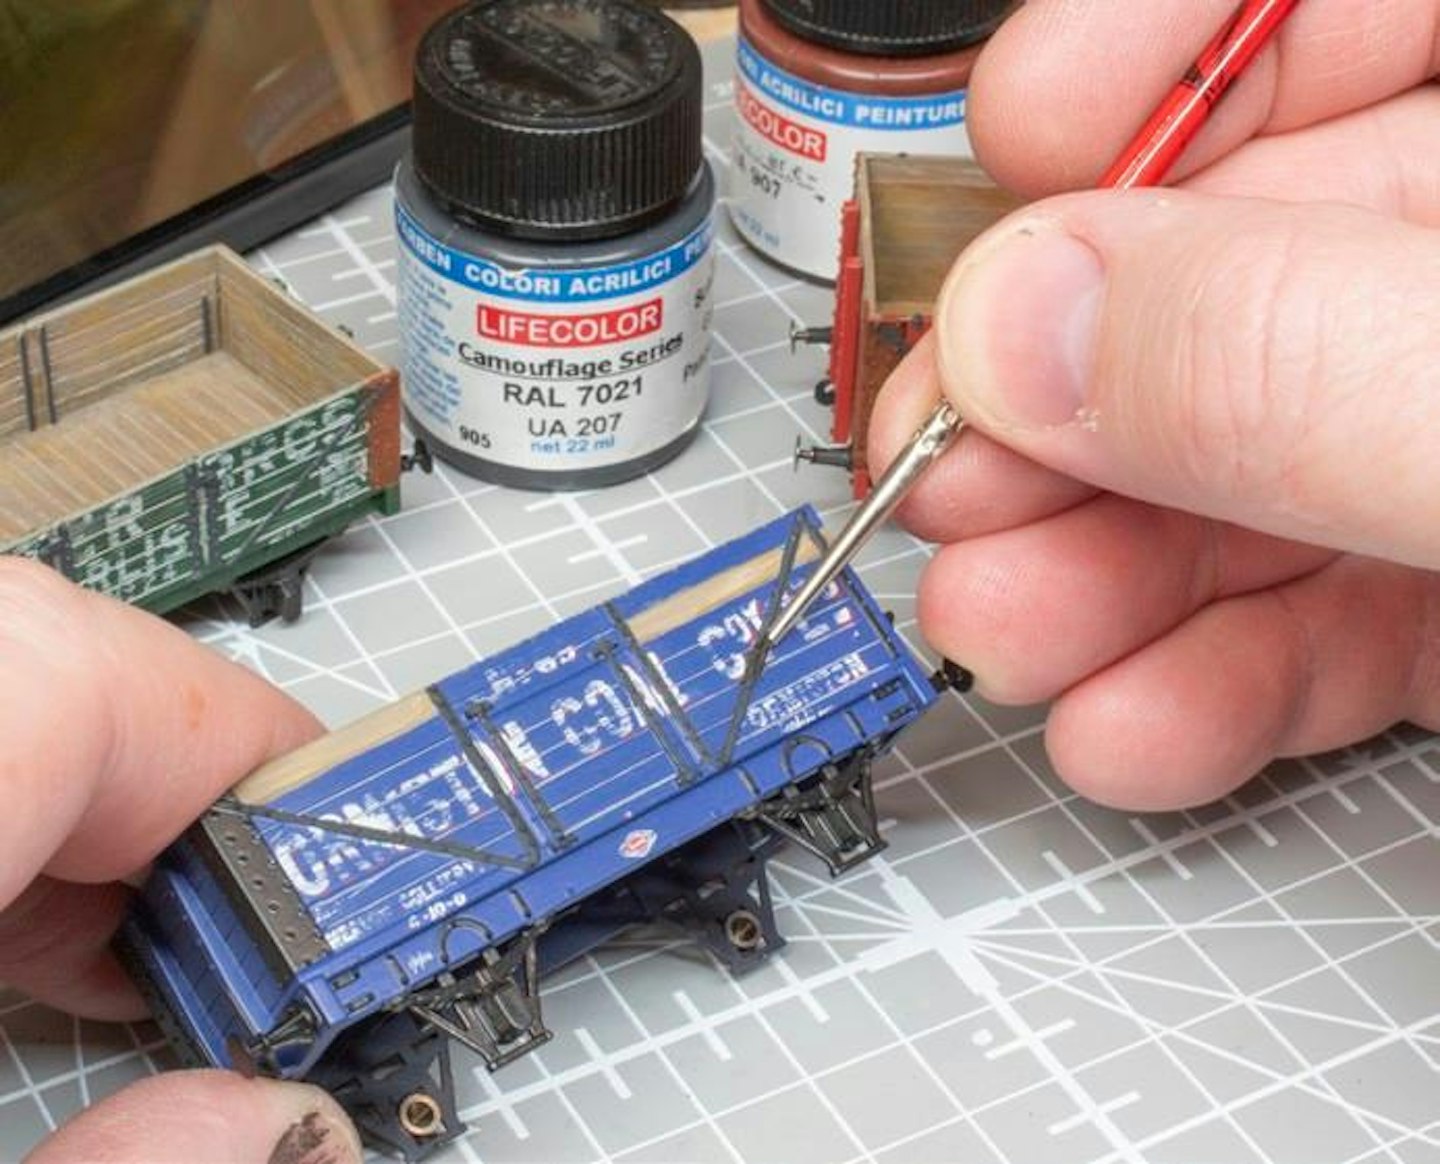
19 Weathering paused while black panels were roughly painted onto the sides and allowed to dry. A fine calligraphy pen and white ink then allowed me to add some BR-era markings, taking numbers from prototype images.
20 It was BR practice to indicate which end of a wagon featured an unloading door using a white diagonal stripe. I used an off-white ‘dust’ shade, so it wouldn’t be too stark, applied along the raised strapping.
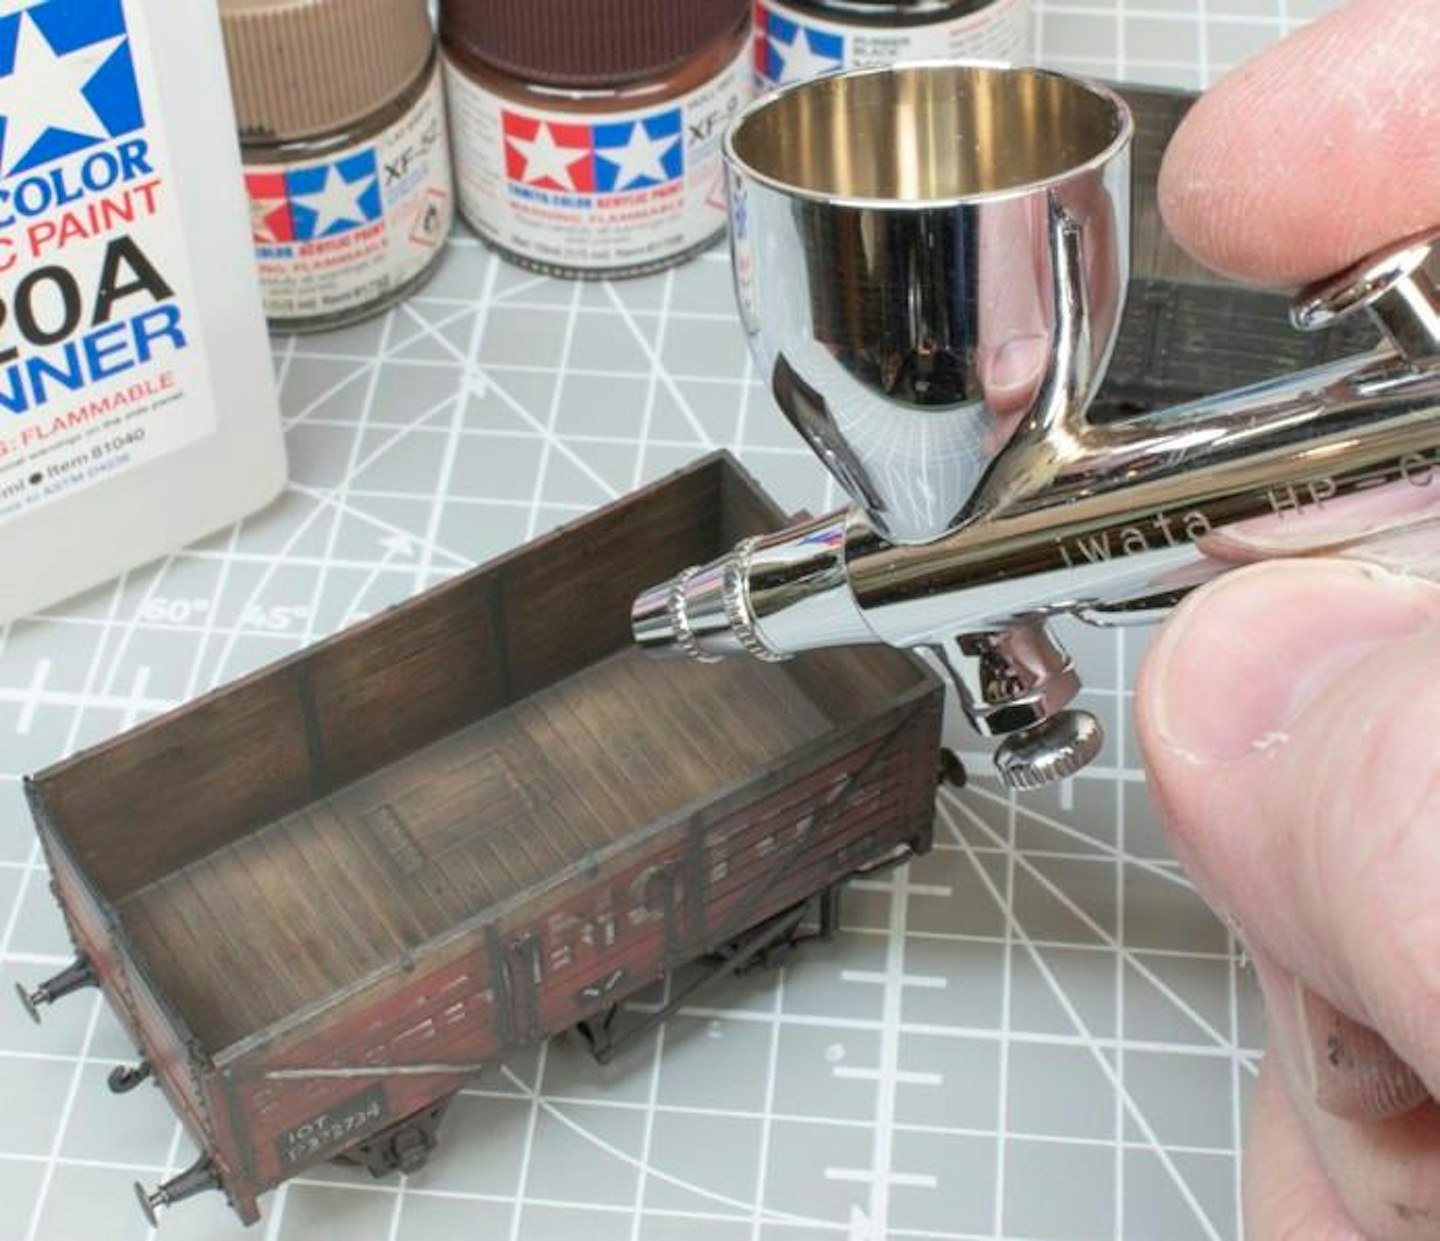
21 The wagons looked suitably grubby and could well have been left as they were but, for a more refined finish I created a dark brown/grey blend of thinned Tamiya acrylic paints and misted it through an airbrush.
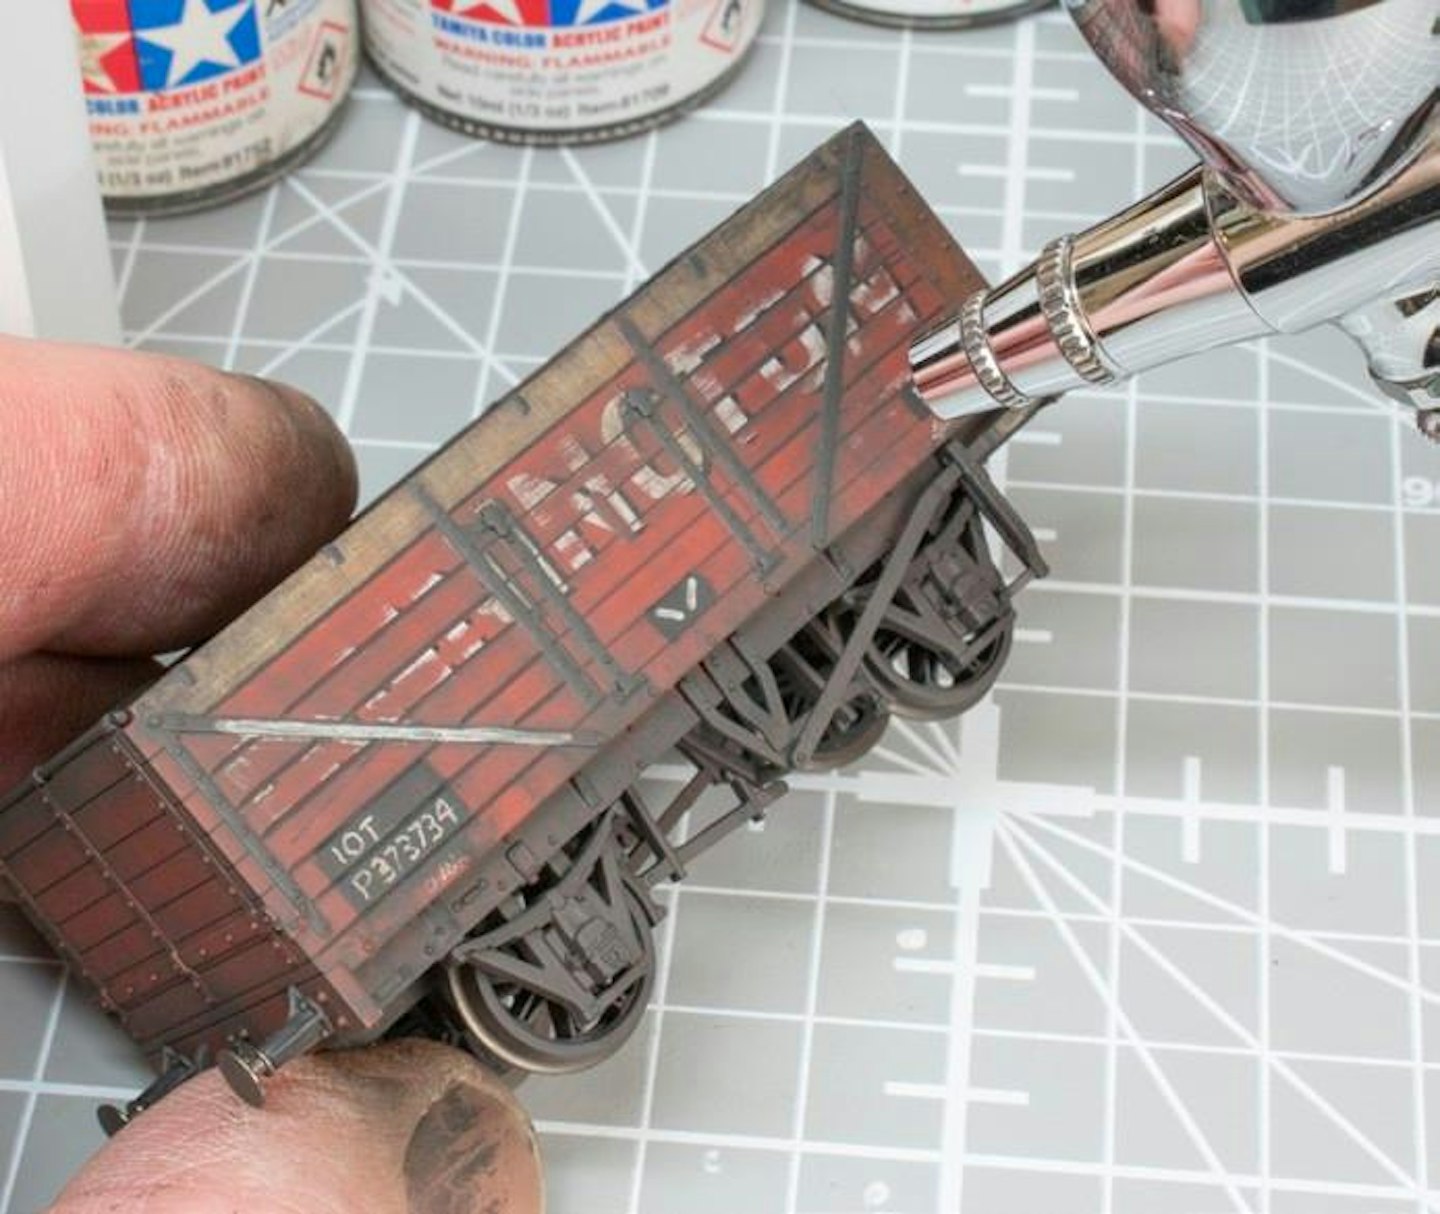
22 My aim was to add very subtle shading to complement the hand-applied weathering coats, so only a very fine mist of paint was targeted around the strapping, doors, lower edges, underframe and interior.